

Keep three related records when buying used excavator parts: identification and condition evidence, the written supply scope, and agreed acceptance terms. Request qualified findings appropriate to the actual component. Photographs and paperwork support the review but cannot independently prove serviceability.
A repeatable workflow makes this practical. You collect evidence, run a heavy equipment pre-shipment inspection checklist, write the supply scope, complete verification, and use the same pre-shipment inspection checklist every time. You also agree on acceptance criteria in writing. This approach turns a pre-shipment inspection into a decision tool and keeps each supply agreement clear.
Key Takeaways
Keep identification and condition evidence, written supply scope and agreed acceptance terms together for each purchase.
Photos by themselves are not enough. Pair each photo with a written note to make strong evidence.
Use a pre-shipment inspection checklist to record the part’s condition and prevent costly surprises.
Write a clear supply scope that lists every item included and states what is left out in plain terms.
Check that the part matches its paperwork before you pay. Look at the identifying marks and documents to confirm it.
Evidence for Used Parts Excavator Parts
Building Reliable Condition Evidence
Written evidence matters because a photo shows a surface, not a story. Photos alone cannot tell you how a part was stored, handled, or removed from a machine. Documented findings give you a fair basis to compare realistic purchase options. You weigh each candidate on recorded facts instead of impressions.
A condition record should capture four things. Note the visual appearance of the item. Record structural observations, such as bends, cracks, or repaired areas. Describe corrosion and contamination in plain terms. State which attached components are present and which are absent. Phrase every finding as an observable statement, not a judgment. Write “surface rust on the mounting flange,” not “poor condition.” The seller completes the record, and you acknowledge it before shipment. That acknowledgment turns the record into shared evidence both sides can rely on.
Photo Records and Wear Notes
Request clear overall and detail photographs of the actual offered item, including relevant markings and visible damage. Pair images with descriptive notes and keep identity references distinct. Generic illustration rules for a blog image do not apply to real purchase evidence.
Record wear as descriptive observations only. Describe what you see, such as polished surfaces or rounded edges, and leave measurement procedures out of the record. This keeps the file honest and traceable evidence for later review. The same discipline supports your pre-shipment inspection and protects both sides of the deal.
Heavy Equipment Pre-Shipment Inspection

A qualified assessment should cover the actual offered component and its intended application. Agree the scope and limitations before the work. Do not perform operational tests, disassembly or internal measurements yourself.
Pre-Shipment Inspection Checklist
Build the checklist around the actual part, its identification, included items, qualified condition findings and any appropriate test records. A parts purchase does not require a whole-machine checklist unless the assessment specifically calls for it.
Tie the checklist to the exact machine and setup you are reviewing. Record the machine’s identity with the model and serial number, and confirm the exact model and market setup. Put the agreed inspection scope in writing before work starts. Note attachments, spare parts, and documents that come with the part. When a full agreed function cycle applies, document it through qualified function testing and setup checks. Set the agreed test scope ahead of time, so the report covers what you really need.
Evidence Package for Pre-Shipment Inspection
Compare supported application, actual condition findings, written scope and total quoted cost. Keep whole-machine tonnage or hours separate from evidence about the offered component; they do not establish its present condition.
The evidence package also holds your acceptance criteria in place. Each finding in the report should match a photo and a written note, so the evidence backs up the verification step later. Keep the package complete and consistent, and treat every gap as a question to settle before payment. Strong evidence at this stage makes the supply scope easier to write and the final verification faster.
Writing the Supply Scope
Inclusions, Exclusions, Quantities
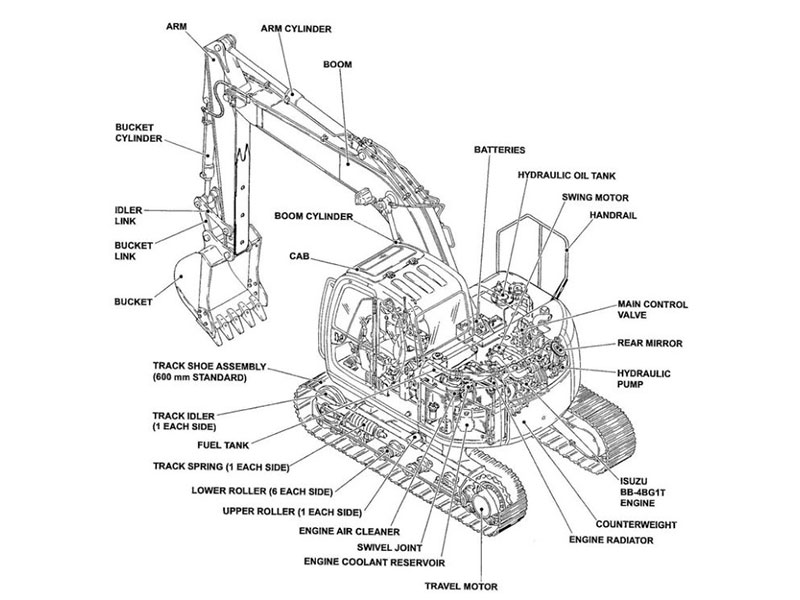
The supply scope is a written list of what you get. It must name every item included and state each exclusion clearly. Say plainly whether mounting hardware, hoses, or a control valve come with the part. Then name what stays behind, such as pins, bushings, or a wiring harness. An exclusion that is not named becomes an argument at delivery. A clear scope protects both sides, because you know what to expect and the seller knows what to prepare.
State the selling unit, quantity and each included or excluded accessory. Record supported references and relevant configuration details for the actual items; omit unrelated attachment categories.
Packaging and Delivery Terms
Agree appropriate packaging and protection for the actual part with qualified handling or transport personnel. Document the packed shipment, included loose items and any preservation requirements. Do not assume one crating or coating method suits every component.
Delivery terms belong in the scope as well. Name who arranges transport and where responsibility passes from seller to buyer. Describe the receipt documentation the carrier will present, and note who signs it. Sign or acknowledge the scope before the part leaves the seller’s facility. Keep the signed copy with your purchase file. A signed scope gives you a check-off sheet at receipt, and it closes the supply agreement on terms both sides recorded.
Verifying Qualified Components
Acceptance Criteria and Documents
Agree commercial acceptance terms in writing after qualified personnel determine the applicable technical requirements. A buyer and seller cannot make an unsafe or incompatible part acceptable merely by agreeing on a cosmetic defect list.
Ask for three kinds of documents. Get inspection records from the seller or a third party. Get past service history if the seller has it. Get any verification reports the seller keeps on file. Then check each document to see that it is complete and matches the photo record. A report that lists a repaired crack should match a photo of that repair. A missing page is a question you need to ask, not a small detail.
Traceability and Records
Record available markings, component references and donor information where known. Link documents to the offered item while keeping donor, receiving machine and component identities separate. A matching record does not independently prove its claimed origin.
Review supported application separately from supplied scope and condition. Matching paperwork or a layout photograph alone does not establish suitability for the receiving machine.
Keep one purchase file for every part. It holds the condition record, the supply scope, the qualification documents, and the delivery receipt. This file is your traceable evidence when a question comes up months later. Strong records also help with resale value and maintenance planning, because the next owner can read the same evidence you collected.
Verification does not stop when the paperwork is done. Compare each document against the photo record one more time before you pay. Any gap becomes a written question for the seller. A complete file gives you confidence, and it gives the seller a fair record of what changed hands.
Applying the Workflow
Written Terms and Review
Follow the same steps for every deal. First, ask the seller for the condition record. Second, look over the draft scope and mark any missing line. Third, put your acceptance criteria in writing. Fourth, approve the package in writing before money moves. This order keeps each decision tied to a document.
Put all three records into one purchase document. The document points to the condition evidence, the supply scope, and the qualification file, so nothing rests on a phone call. When you find a gap, work out a written fix before payment. A promise to fix a problem after delivery carries little weight. A written fix carries real weight.
Consistent Use Across Purchases
Use the same checklist, scope template, and verification file for all used-part purchases. A repeatable template shortens each review and makes options easy to compare. At receipt, check the delivered items against the scope line by line. Check the machine identity on the paperwork against the marks you recorded. Confirm the final specification matches what arrived.
Match the depth of documentation to the purchase. Higher-value or critical parts deserve the full file, including a pre-shipment inspection and third-party verification. Routine purchases can use a simpler version with the same core records. Neither path is wrong. Each one fits a different level of risk.
Consistency pays off over time. Your evidence file grows into a reliable history, and each new purchase starts from a proven template. That habit protects both sides and sharpens every buying decision you make.
Every purchase needs three written records: condition evidence, a clear supply scope, and verified qualification documents. Photos alone cannot do this job. Finish all three before you pay, then check each one against the delivered items when they arrive. Keep the signed copies together.
Good records protect both sides of the deal. They also improve your buying decisions over time, because each file becomes a guide for the next one. Put any gap in writing before money moves.
Resolve essential identification, condition and scope questions before committing to the purchase.
FAQ
What should a condition record include before you pay?
Ask for notes on how the part looks, its structure, rust and dirt, and a list of parts that are attached or missing. Each finding should be something you can see, not an opinion. The seller fills out the record, and you sign off on it in writing before shipment.
Why does a photo set need written notes?
Photos and descriptive notes help explain the actual offered item and recorded damage. Include relevant identification markings where available; photographs alone do not establish hidden condition.
When does a third-party inspection make sense?
A third-party inspection works best on higher-value or critical parts, where a fresh set of eyes lowers your risk. Inspections from the seller are still useful for everyday purchases. Either way, trust qualified reports and skip your own operating tests, taking things apart, or measuring.
What belongs in the supply scope?
List every item you get and name each thing left out, such as pins, bushings, or a wiring harness. State quantities in plain numbers and confirm one unit versus a set. Add packaging, rust prevention, and delivery terms. Sign or acknowledge the scope before the part leaves the seller’s facility.
How do you confirm a part matches its paperwork?
Match the part to its documents using identifying marks you write down. Check the model, serial number, part number, and relevant specs against the file. Confirm the setup fits your machine. Keep the condition record, scope, qualification documents, and delivery receipt together for later.
For excavator parts sourcing, consider YNF Machinery. Share full machine and component identification, applicable part references and quantities, and request supported compatibility information, an actual quotation, and written warranty and return terms before ordering.