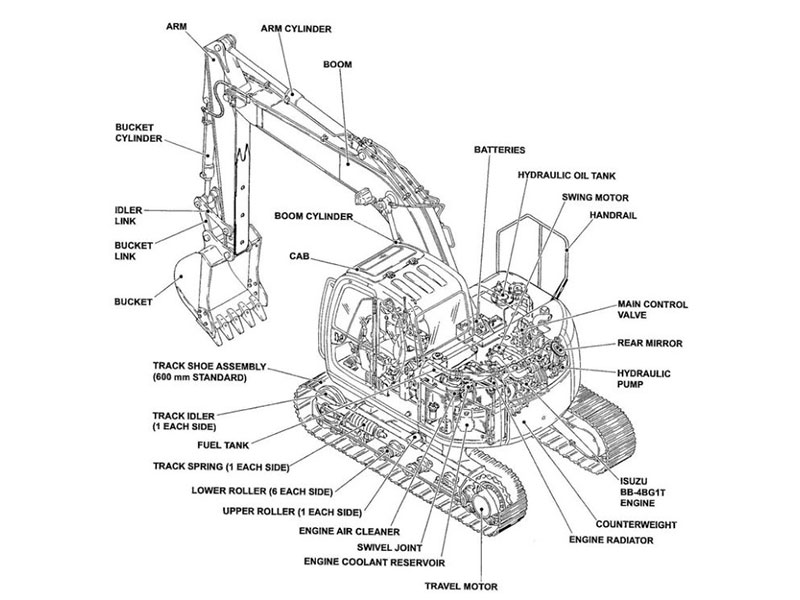

You want your excavator to work well and not cost too much. Using repair kits for excavator parts is a smart way to save money. Repair kits help keep your machine in good shape. Many owners fix problems like hydraulic leaks, track wear, or electrical issues with simple kits. Look at the most common repairs you can do:
Repair Type | Common Signs |
|---|---|
Hydraulic system | Slow response, oil leaks |
Chassis | Track wear, cracks, shaky walking |
Accessories | Cracks, loose parts |
Electrical system | Alarms, weird instrument readings |
Cab | Slow gauges, old safety gear |
Fixing these repairs early helps you avoid big breakdowns.
Key Takeaways
Use repair kits to fix common excavator problems like hydraulic leaks and worn tracks. This can help you save money and stop big breakdowns.
Pick the right repair kit by looking at material quality, size, and user reviews. This makes sure you get a kit that fits your excavator and lasts longer.
Check your excavator often and do regular maintenance to find problems early. This can stop expensive repairs and keep your excavator working well.
Try to do simple repairs yourself, like changing filters or seals. This saves money on labor and keeps your machine in good shape.
Buy repair kits in bulk to get discounts. Keep important kits ready so you can fix things fast and avoid waiting.
Choosing Repair Kits for Excavator Parts

Identify Common Repairs
You want to fix your excavator before small problems turn into big ones. Start by looking at the repairs you do most often. Check your Operation and Maintenance Manual. This book tells you which parts need regular care and which repair kits for excavator parts fit your machine. If you see oil leaks, slow hydraulics, or worn tracks, you know what to look for. Ask other operators about their experiences. They can tell you which brands work best and which ones to avoid.
Match Kits to Needs
Not all repair kits for excavator parts are the same. You need to pick the right kit for your job. Here are some things to check:
Material Quality: Strong materials last longer. You can use a hardness tester to check.
Size Matching: Make sure the kit fits your excavator model. Measure the parts if you are not sure.
Manufacturing Process: Kits made with precision casting or heat treatment last longer.
Safety Certifications: Look for ISO9001 or other marks that show good quality.
User Reviews: Read what other people say about the kit.
You also need to think about the type of seals in your kit. NBR seals work well for oil and cost less. HNBR seals handle heat and ozone better. FKM seals are best for tough jobs with high heat or chemicals.
OEM vs. Aftermarket Kits
You have two main choices for repair kits for excavator parts: OEM and aftermarket. OEM kits come from the same company that made your excavator. They fit well and last a long time. Aftermarket kits cost less, but the quality can change from one brand to another. Here is a quick look:
Aspect | OEM Repair Kits | Aftermarket Repair Kits |
|---|---|---|
Reliability | Very reliable | Can vary |
Cost | More expensive | Usually cheaper |
Warranty | 6-12 months or longer | 1-3 months |
Performance | High and steady | Can be good or not so good |
Availability | Sometimes limited | Often easy to find |
If you want peace of mind, OEM kits are a safe bet. If you want to save money and do not mind a little risk, aftermarket kits might work for you.
Preventive Maintenance to Lower Cost
Regular Inspections with Kits
You can keep your excavator working well by checking it often with repair kits. When you look at your machine a lot, you can find problems early. Most experts say you should follow the rules from the company that made your excavator. Teach your team to look for things that are worn out or broken. If you find problems soon, you will not have to pay a lot for repairs or lose time. Did you know that if your machine stops working without warning, it can cost up to $5,000 each day? That is a lot of money to lose.
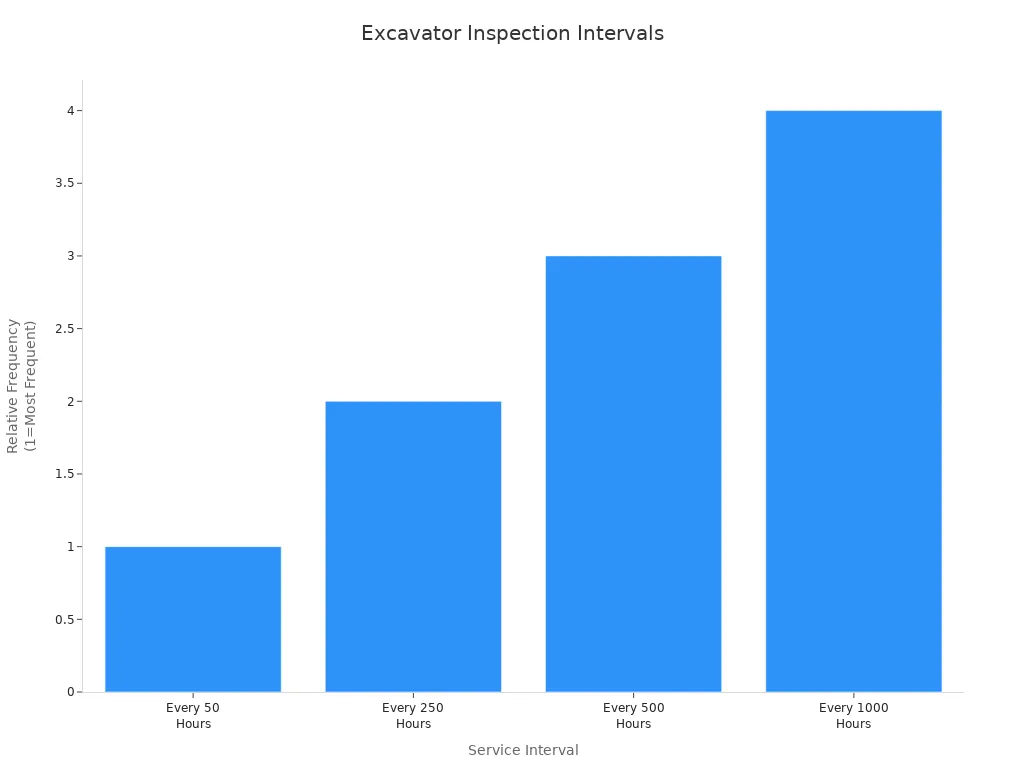
Here is a simple chart that shows how often you should check your excavator:
Interval | Frequency | Tasks |
|---|---|---|
Every 50 Hours | About weekly | Grease all points, clean radiator, check air filter, look at hydraulic hoses, check track tension, clean undercarriage, check swing gear oil. |
Every 250 Hours | About monthly | Change engine oil and filter, change fuel filter, check coolant, look at belts, test hydraulic pressure. |
Every 500 Hours | About every three months | Change hydraulic oil filter, clean cooling system, check undercarriage, look at swing bearing, test safety systems. |
Every 1000 Hours | Big service | Change hydraulic fluid, check electrical system, measure undercarriage, look at welds. |
Early Replacement of Worn Parts
You should not wait for parts to break. Changing parts early saves money and keeps your excavator safe. When you use repair kits, you can change old seals, hoses, or filters before they make things worse. Doing service on a schedule helps you get ready for repairs. Using work orders and inspection forms on your phone helps you remember everything. If you change parts early, your machine will not break down and can keep working.
Tip: Teach your repair team to find problems early. This helps you fix things before they get too expensive.
Maintenance Checklists
A checklist helps you keep your excavator in good shape. You can use a list before you start, when you start, and when you stop your machine. These lists help you remember what to check every time. Here is a simple checklist for using repair kits:
Item | Description |
|---|---|
Undercarriage | Look at tracks, rollers, idlers, and sprockets for damage or wear. |
Filters | Check and clean or change air, hydraulic, and fuel filters. |
Belts and Hoses | Look for cracks, leaks, or wear; change if needed. |
Lights and Signals | Test all lights, signals, and alarms to make sure they work. |
Controls and Safety Devices | Make sure all controls and safety devices work right. |
Bucket and Attachments | Check for damage and make sure bucket teeth are tight. |
Greasing | Put grease on the right spots to stop wear. |
Documentation | Read the operator’s manual and look at maintenance logs for what to check. |
You should also check engine oil, hydraulic fluid, track tension, cooling system, and safety systems. Do not forget to look at the operator’s seat and put grease on attachment pins. When you use a checklist, you make sure you do all the important maintenance.
DIY Repairs and Cost Savings

Safe DIY Repairs with Kits
You can handle many small repair jobs on your excavator without calling a mechanic. Simple tasks like changing filters, replacing worn seals, or fixing a leaky hose are perfect for DIY. These repairs do not need special tools or advanced skills. You just need a good repair kit and a little time. When you do these repairs yourself, you save money on labor and avoid long waits for service.
Some repairs are better left to the experts. If you see big cracks in the frame, major hydraulic leaks, or electrical problems, call a professional. These repairs need special training and tools. Trying to fix them yourself can make things worse or even cause injury.
Tip: Start with easy repairs. As you get more confident, you can try more complex jobs.
Follow Instructions and Safety
Safety comes first when you repair your excavator. Always read the instructions in your repair kit before you start. The manual shows you the right steps and helps you avoid mistakes. You should also follow these safety tips every time you repair your machine:
Wear the right personal protective equipment (PPE) like gloves, goggles, and work boots.
Disconnect all power sources before you begin any repair.
Work in a well-ventilated area to avoid breathing in fumes or dust.
If you follow these steps, you can finish your repair safely and quickly. You also protect yourself and your team from accidents.
Doing your own repairs helps you save money over time. You do not have to pay for a mechanic to come out for every small problem. You also keep your excavator working longer, which means fewer big repairs in the future. When you use a repair kit the right way, you get the job done fast and keep your costs low.
DIY Repair Task | Skill Level | Tools Needed | Time Needed |
|---|---|---|---|
Change air filter | Easy | Wrench, gloves | 15 minutes |
Replace bucket teeth | Medium | Hammer, wrench | 30 minutes |
Fix hydraulic hose | Medium | Wrenches, kit | 45 minutes |
Change seals | Easy | Seal pick, kit | 20 minutes |
You can see that many repairs are quick and simple. Try a few yourself and watch how much you save money each month.
Buy Kits in Bulk and Save
Find Discounts and Promotions
You want to save money on excavator repairs, right? Buying repair kits in bulk is one of the easiest ways to cut costs. Many suppliers offer discounts when you buy several kits at once. You can also watch for sales or special promotions. Sometimes, you get extra parts or free shipping if you buy during these events.
Here are some tips to help you find the best deals:
Check both new and used options for repair kits. Used parts can help you save money, but make sure they meet quality standards.
Look for suppliers with large inventories. Aftermarket suppliers often have more choices and better prices.
Compare prices from different sellers. Some offer warranties, which means you get higher quality and peace of mind.
Ask about bulk pricing. Many companies will lower the price if you buy more than one kit.
Tip: If you plan ahead and buy during sales, you avoid paying extra during emergencies.
Stock Essential Kits
You never know when your excavator will need a quick fix. If you keep essential repair kits in stock, you can handle most repairs right away. This helps you avoid downtime and expensive rush orders.
Here’s a list of kits you should always have on hand:
Air filters
Hydraulic filters
Seals
Hoses
Bucket teeth
Fuel filters
Oil filters
You can use a min/max stocking strategy. Set a minimum number for each kit, so you never run out. Set a maximum to avoid wasting money on parts you don’t use. Stocking critical spare parts like hydraulic hoses, filters, and bucket teeth before you need them keeps your excavator running smoothly.
If you buy in bulk and keep the right kits ready, you save money and avoid emergency expenses. You also reduce downtime and keep your projects on track.
Maximize Repair Kit Value
Store Kits Properly
You want your repair kits to last as long as possible. Good storage makes a big difference. If you keep your kits in a dry, cool place, you stop rust and damage. Use shelves or bins to organize everything. Label each kit with the part name and date you got it. This helps you find what you need fast.
Try using the first-in, first-out (FIFO) method. Always use the oldest kits first. This keeps seals, filters, and other parts fresh and ready to go. If you have a lot of kits, make a simple chart to track what you have:
Best Practice | Description |
|---|---|
FIFO Management | Use older kits first to keep parts fresh and avoid waste. |
Maintenance & Repair | Do regular checks and repairs to stop small problems from getting bigger. |
Use OEM Parts | Pick parts that match your machine for the best fit and long life. |
Tip: Don’t wait to fix small issues. Quick repairs with the right kit can stop bigger, more expensive problems.
Use All Components Efficiently
Every part in your repair kit has a job. If you use all the pieces, you get the most value for your money. Before you start a repair, lay out all the parts and check your manual. Make sure you know where each piece goes. This helps you avoid missing anything important.
Here are some ways to get the best use from your kits:
Check which parts you need for each job. Focus on size, fit, and strength.
Pick kits from brands you trust. Good parts last longer and work better.
Keep extra parts handy. Fast access to spares means less downtime.
Ask experts or read reviews if you’re not sure about a kit.
Best Practice | Description |
|---|---|
Understand Required Parts | Know what you need for each repair. |
Use kits from trusted brands for better results. | |
Consider Long-term Maintenance | Think about how often you’ll need to replace parts. |
Ensure Spare Parts Availability | Keep spares ready to avoid delays. |
Seek Specialist Advice | Get help from experts or check reviews before buying. |
Regular checks and smart repairs keep your excavator running strong. When you use your kits wisely, you save money and avoid waste. That’s how you get the most from every repair kit you buy.
You can save a lot of money on excavator repairs. Use repair kits, check your machine often, and fix easy problems yourself. Here’s how this helps you:
You find small problems early and stop big breakdowns.
You have less downtime, use less fuel, and your machine lasts longer.
Buying smart and using checklists can stop most breakdowns and save lots of money every year.
Maintenance Strategy | Description |
|---|---|
Regular Monitoring | Check important things like oil pressure and temperature. |
Record Keeping | Write down all repairs to see if your excavator is reliable. |
Start these habits now. Your excavator will work better for a long time.
FAQ
How do I know if a repair kit fits my excavator?
Check your excavator’s model number. Look at the kit’s label or product description. If you’re not sure, ask your dealer or supplier. You can also read your machine’s manual for part numbers.
Can I use aftermarket kits without voiding my warranty?
Some warranties only cover OEM parts. You should read your warranty terms before using aftermarket kits. If you want to stay safe, ask your dealer first.
What repairs can I do myself with a kit?
You can change filters, seals, hoses, and bucket teeth. These jobs are simple and safe for most owners. For big cracks or electrical problems, call a pro.
How should I store extra repair kits?
Keep kits in a dry, cool place. Use shelves or bins. Label each kit with the part name and date. Try to use older kits first so nothing goes bad.