You can change parts on your excavator hydraulic cylinder by following easy steps. Always pick the correct tools and put on safety gear before you start. Safety is most important when you work with a hydraulic cylinder under pressure. Take your time to look at each part and follow every step carefully. This way helps stop injuries and keeps the machine safe.
Key Takeaways
Always stay safe by wearing safety gear and following rules. This helps stop injuries when you work with hydraulic systems.
Use the right tools for the job. Having the correct equipment ready helps you work faster. It also stops damage to the hydraulic cylinder.
Check the new hydraulic cylinder before you put it in. Look for any damage to make sure it works well. This helps stop leaks later.
Test the hydraulic system after you finish. Look for leaks and make sure it works smoothly. This shows that everything is working right.
Check your excavator every 250 hours. Look for leaks, check seals, and change filters. This keeps your excavator working well.
Tools and Safety
Tools for Excavator Hydraulic Cylinder
You must use the right tools to work safely. Get all your tools ready before you start the job. Here are some tools you need:
Cylinder repair benches
Precision measurement tools like bore gauges
Seal pick and snap ring pliers
Lifting straps for moving heavy parts
Cylinder-specific seal kits
Gland nut wrenches
Seal installation tools
Piston ring compressors
Honing equipment
Rubber mallets
Torque wrenches
Hydraulic test rigs
Tip: Put your tools in order before you begin. This helps you work faster and keeps your area safe.
Safety Gear
Wearing safety gear keeps you from getting hurt. Make sure you have these items:
Gloves resistant to hydraulic fluids
Safety glasses to shield your eyes from high-pressure spray
Face shields for extra protection
Steel-toed shoes to guard your feet
Protective clothing, including long pants and long sleeves
Note: Look at your safety gear for any damage before you start.
Safety Precautions
Do these things to make your work area safe and lower risks:
Wear personal protective equipment (PPE) every time you work.
Let out hydraulic pressure before touching any part. Use pressure relief valves and follow the instructions from the manufacturer.
Fix leaks fast and use the right hydraulic fluid. Keep fluids in safe places so they do not get dirty.
Check hoses and fittings for cracks or damage. Change any parts that are broken.
Keep your work area clean and bright. Make sure you can reach emergency shut-offs easily.
Environmental tip: Do not let hydraulic fluids go into drains or water. Throw away used fluids and dirty materials with approved waste services. Contractors must recycle or throw away fluids as hazardous waste by local laws.
Training Option | Description |
|---|---|
Mobile Hydraulic Mechanic Certification | Learn how to take care of hydraulics, fix problems, and do hands-on tests. |
Excavator Certification Course | Learn safety steps, how to use machines, and how to keep them working well with lessons and practice. |
You stay safe and work better by following these rules. Good training helps you change hydraulic cylinders with confidence.
Preparation
Shut Down Excavator
Turn off your excavator before you work on the hydraulic cylinder. Follow these steps to stay safe:
Look at the work area and check the machine for problems.
Move the excavator to a flat place. Put all attachments down.
Let the engine run slowly for a few minutes. This cools the system.
Turn off the engine. Use the hydraulic lock switch to stop movement.
If you will not use the excavator for a long time, disconnect the battery.
After you shut down, look for leaks or damage and check fuel levels.
Tip: Always do what the manufacturer says when shutting down your machine. This keeps you safe and protects your equipment.
Release Hydraulic Pressure
Release hydraulic pressure before you touch any part of the system. Use the pressure relief valves as your manual says. Make sure you use the hydraulic lock switch. This stops fluid from moving and lowers the chance of injury.
Note: Do not skip this step. Hydraulic pressure can hurt you if it comes out fast.
Inspect Work Area
Check your work area for dangers before you start replacing the hydraulic cylinder. Use the table below to find common hazards:
Hazard Type | Description |
|---|---|
Hydraulic fluid leaks | Slippery surfaces can make you fall. Fluid leaks can also cause injuries. |
Health problems | Hydraulic fluids can bother your skin or cause health issues. |
Fire hazard | Hydraulic fluid can burn if it touches heat or sparks. |
Fluid leaks | Bad seals or hoses can leak and make things unsafe. |
Loss of power | Leaks can lower power and change how the excavator works. |
Safety tip: Clean up spills right away. Wear gloves and keep fire extinguishers close.
Common mistakes during preparation are:
Putting parts together wrong after maintenance
Missing alignment problems
Not testing after putting parts back
Changing seals the wrong way
Not checking parts well enough
You can avoid these problems by checking each step and making sure your work area is safe. Careful preparation helps you replace the hydraulic cylinder without trouble.
Remove Hydraulic Cylinder
Detach Hydraulic Lines
You must start by disconnecting hydraulic lines from the excavator hydraulic cylinder. Follow these steps to avoid spills and keep the system clean:
Turn off the hydraulic power source. Depressurize the system by operating the control valves.
Find the hose you need to remove. Use your excavator’s manual or schematic for help.
Clean the area around the hose fittings. Wipe away dirt and debris so nothing gets inside.
Use the right tools to loosen the fittings. If the fittings are stuck, apply a small amount of penetrating lubricant.
Place a container under the hose. Catch any fluid that comes out when you remove the hose.
Support the hose as you pull it away from the connection. This helps prevent spills.
Plug or cap the open ends right away. This step keeps dirt out and stops leaks.
Tip: Use plugs like thread seal plugs, hydraulic sealing plugs, or ORFS caps to seal hydraulic ports. These plugs keep the system clean and prevent contamination.
You must always check for leaks after disconnecting hydraulic lines. If you see any fluid, clean it up quickly.
Remove Cylinder Parts
After you finish disconnecting hydraulic lines, you need to replace excavator cylinder parts. Work carefully to avoid damage:
Make sure the hydraulic cylinder is depressurized.
Secure the cylinder so it does not slip or fall.
Clean the outside of the cylinder. Remove all dirt and debris.
Look at the cap type. Use the right tool for the cap.
Use the correct tool to loosen the cap. Do not use too much force.
Apply steady, even torque. Work slowly to avoid breaking anything.
Pull the cap off smoothly. Do not jerk or twist.
Check the threads and inside parts for damage.
Note: When you replace excavator cylinder parts, always inspect each part for wear or cracks. Replace any damaged items before you continue.
You must keep all removed parts organized. This makes it easier to put everything back together later.
Extract Cylinder
Now you can extract the hydraulic cylinder from the excavator. Take your time and follow these best practices:
Best Practice | Description |
|---|---|
Regular Maintenance | Keeps the hydraulic cylinder working well and helps you spot problems early. |
Attention to Detail | Lets you see trouble signs before you remove the cylinder. |
Understanding Damage Causes | Helps you avoid damage during extraction. |
Before you start, inspect the cylinder for outside damage. Look for signs of overload or stress. If you see any problems, fix them before you continue.
Check for damage before you extract the cylinder.
Look for signs of heavy use or overload.
Remove any pins and mounts holding the cylinder in place. Use the right tools and support the cylinder as you work.
Lift the cylinder out slowly. Do not let it hit other parts.
Plug all open ports with the right caps or plugs. You can use flanged plugs, O-ring boss plugs, or JIC hydraulic caps.
Safety tip: Always ask for help when lifting heavy parts. Use lifting straps or a hoist to move the hydraulic cylinder safely.
You must keep the work area clean and organized. This helps you avoid mistakes and keeps the excavator safe.
Install New Cylinder
Inspect New Hydraulic Cylinder
Check the new hydraulic cylinder before you put it in. Look for any problems so you do not have trouble later. Use this table to help you check:
Inspection Criteria | Description |
|---|---|
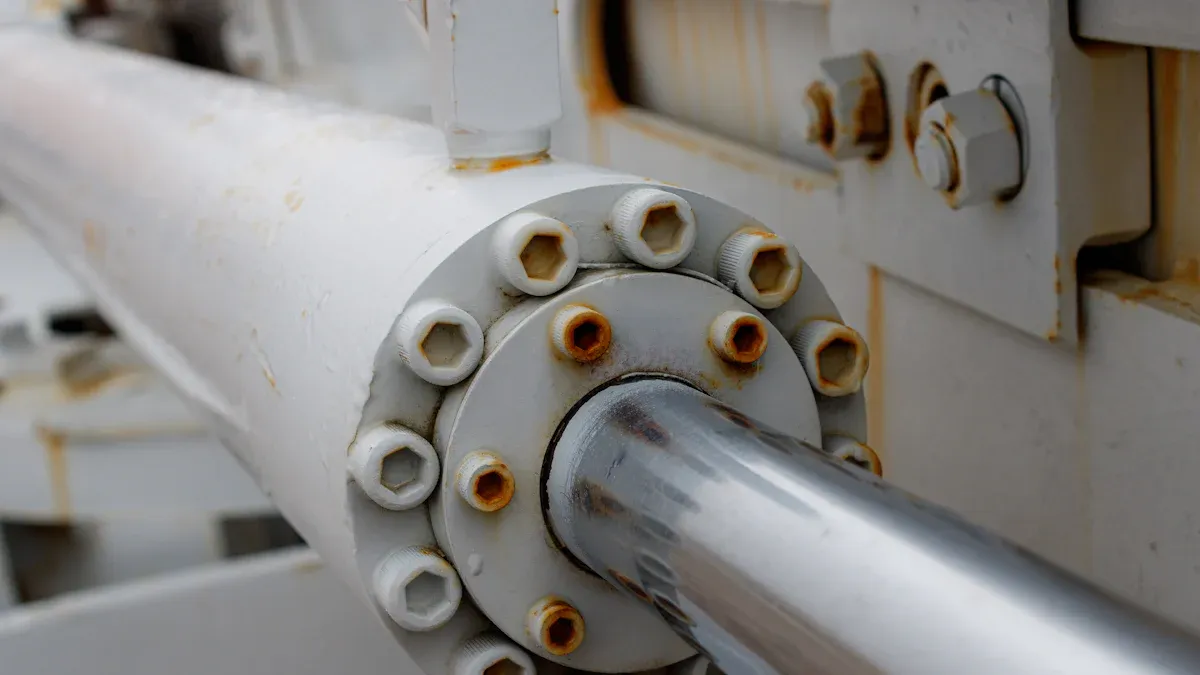
Cylinder Tube Surface | Look for dents, scratches, or weld marks. These can mean the part was not handled well. |
Rod Condition | Check for peeling chrome, rust, or marks. These can make seals wear out and cause leaks. |
Seal & Wiper Area | Seals should look even and have no cuts. Wipers should not be cracked or loose. |
Mounting Interfaces | Look for sharp edges or cracks. Bad finishing can make it hard to install and cause problems. |
Port & Thread Quality | Make sure ports and threads are clean and not broken. Bad threads can make leaks happen. |
Labeling & Documentation | Check for clear labels and matching papers. Missing labels can cause problems with the warranty. |
Tip: Always change any part that looks damaged or worn out. This helps stop leaks and keeps your excavator hydraulic cylinder working right.
If you need a good place to buy new hydraulic cylinders, you can try YNF Machinery. They sell good parts and give you the right papers.
Secure Cylinder Parts
After you check the parts, you need to make them tight. Use the right tools and follow the torque numbers to keep things safe. Here is a table with the torque you need for each part:
Component | Torque Specification |
|---|---|
Rod End Nut | 4027 ft-lbs |
Gland Head Bolts | 197 ft-lbs |
Here are the steps to make the cylinder secure:
Line up the hydraulic cylinder with the mounting spots.
Put in the mounting pins and make sure they fit well.
Tighten the rod end nut and gland head bolts to the right torque. Use a torque wrench to be sure.
Make sure all parts are flat and do not move.
Check the rod for dirt or if it is not straight before you finish.
Note: If you do not check the torque, you might get leaks or break something. Always use the right numbers.
Some mistakes people make are leaks, the cylinder moving by itself, and rod damage. You can stop these by checking seals, cleaning the rod, and making sure everything lines up before you finish.
Reconnect Hydraulic Lines
You need to hook up the hydraulic lines to the new cylinder to make it work. Follow these steps to stop leaks:
Clean all the fittings and connections first.
Put sealing stuff, like thread sealant or O-rings, on each fitting.
Tighten the fittings to the right torque with a torque wrench. Do not make them too tight.
Turn the hydraulic power back on.
Look for leaks, weird noises, or strange pressure.
Run the system and make sure it works well.
Safety tip: Always look for leaks after you hook up the lines. If you see fluid, stop and fix it before you keep going.
You can stop leaks and cylinder drift by checking seals and O-rings, cleaning all parts, and making sure valves work right. Cleaning and careful work help your hydraulic cylinder last longer.
Test and Rebuilding
After you install the new hydraulic cylinder, you need to test the system and complete the rebuilding process. This step makes sure your excavator works safely and smoothly. You will bleed air, check for leaks, and verify operation. Good cleaning for rebuild and careful testing help prevent problems later.
Bleed Air
Air trapped inside the hydraulic cylinder can cause slow movement and damage. You must remove this air before you use the machine. Follow these steps to bleed air from the system:
Gather all items you need, such as keys, fluid containers, and clean cloths. Make sure the engine is off and all gears are in neutral.
Find the bleeding point on the hydraulic pump.
Open the bleeder nipple to let trapped air escape.
Watch for oil leaking from the nipple. This shows air is leaving the system.
If no oil comes out, open the drain hose from the pump case. Add oil to keep air out.
When oil flows and air is gone, tighten the air drain plug and put the hose back.
Clean the bleeder nipple and wipe up any fluid. Start the engine at low speed for ten minutes to check for smooth operation.
Tip: Always use clean tools and cloths during bleeding. Dirt can harm the hydraulic cylinder.
Check for Leaks
Testing for leaks is a key part of the rebuilding process. Leaks can lower power and damage the hydraulic cylinder. Look for these signs:
See if there are drips, wet spots, or puddles around the cylinder.
Notice if the machine loses power or cannot lift as much.
Watch for slow movement in the cylinder.
Feel for extra heat near the cylinder. Overheating can mean lost pressure.
Listen for odd noises or feel vibrations. These can show lubrication problems.
If you find leaks, stop and fix them before you use the machine again. Replacing seals and components may be needed.
Verify Operation
You must test the hydraulic cylinder after rebuilding. This step checks if the system works right and is safe to use. Try these tests:
Do a pressure test. Make sure the cylinder holds pressure and does not leak.
Move the cylinder through its full range. Check for smooth movement and correct alignment.
Perform an end-of-stroke bypass test. This checks the piston seal for leaks.
Note: Careful testing and cleaning for rebuild help your excavator hydraulic cylinder last longer. Always follow the rebuilding process step by step.
You can change an excavator hydraulic cylinder if you follow each step. Use the right tools for the job. Always look at all connections before you use the machine. Test the system to make sure it works well. Here are some ways to keep your hydraulic cylinder working:
Watch the fluid temperature and color.
Check for leaks and bent rods often.
Change filters every 250 hours.
Test fluid for dirt every 500 hours.
Common Failure Cause | Explanation |
|---|---|
Corrosion and Rust | Water and dirt can make leaks and bad performance. |
Seal Failure | Old seals let fluid leak out. |
Bent Rods | Too much weight or wrong alignment can break rods. |
Write down all maintenance and repairs. This helps with warranty and selling your machine later.
FAQ
How often should you check your excavator hydraulic cylinder?
Check your hydraulic cylinder every 250 hours of use. Look for leaks, bent rods, and worn seals each time. Regular checks help you find problems early. This keeps your excavator safe and working well.
What signs show your hydraulic cylinder needs replacement?
Look for slow movement or leaking fluid. Listen for strange noises or see if lifting power is weak. Bent rods and damaged seals mean you need a new cylinder. If you notice these signs, replace the cylinder soon.
Can you buy hydraulic cylinders from YNF Machinery?
Yes, you can buy hydraulic cylinders from YNF Machinery. They sell good parts and give you clear papers. You get helpful service and support for your excavator.
Why is bleeding air from the hydraulic system important?
Bleeding air helps your hydraulic system work smoothly. Air inside the cylinder makes movement slow and can cause damage. Remove air to stop problems and keep your excavator safe.
What safety gear do you need for hydraulic cylinder replacement?
Wear gloves, safety glasses, steel-toed shoes, and protective clothes. Use a face shield for extra safety. Safety gear protects you from high-pressure fluid and heavy parts.
