You can change your replacement excavator hydraulic pump safely and easily by using a step-by-step guide. Safety is important in every hydraulic repair because high-pressure fluid can hurt you. Working efficiently helps you stop wasting time. Small problems like tiny hydraulic leaks or old pump parts can turn into bigger problems if you ignore them. For example, fixing a leak right away keeps your machine working and saves money on repairs. Waiting too long to replace parts, including your replacement excavator hydraulic pump, can make the system break and cause more downtime.
Issue | If Repaired Immediately | If Delayed |
|---|---|---|
Small hydraulic leak | Quick fix with little interruption | System might fail and you lose more time |
Cracked track | Easy part change, work keeps going | Track could break and stop all work |
Worn-out brake pads | Brakes work safely and smoothly again | Brakes might fail and break safety rules |
Key Takeaways
Always stay safe by letting out hydraulic pressure first. Wear your personal protective equipment before you start any work on your excavator.
Check your hydraulic pump often for leaks or strange sounds. This helps you find problems early and saves money on repairs.
Replace the hydraulic pump by following each step in order. Drain the oil, disconnect the hoses, and make sure all connections are tight. This stops leaks from happening.
Use good hydraulic fluid and filters to keep your system clean. Clean fluid helps your pump last longer and stops it from breaking down.
Do maintenance checks every 100 to 1000 hours. This keeps your excavator working well and saves you money on repairs.
When to Replace Hydraulic Pump
Signs of Pump Failure
Watch for signs that your excavator hydraulic pump is getting old. If you see any of these problems, check your machine soon:
The excavator has trouble lifting or moving things. You notice it does not work as well.
You hear odd noises like grinding or squeaking. These sounds can mean something is wrong inside the pump.
Fluid leaks show up near the pump. Broken seals or hoses can cause leaks and make the system weaker.
The hydraulic system moves slowly. The boom, arm, or bucket may not move right away.
If you take care of your pump, it can last 5,000 to 10,000 hours. Checking often helps you find problems before they get worse.
Tip: Always look for leaks and listen for strange sounds when you check your machine each day. Finding problems early saves time and money.
Confirming Replacement Need
Make sure your hydraulic pump really needs to be replaced before you start fixing it. Try these ways to check:
Diagnostic Method | Description |
|---|---|
Quick Oil Analysis | Checks if the oil is good and looks for dirt or damage. |
Hydraulic System Tester | Measures how much fluid the pump moves at different pressures. |
Noise Meter | Records noise levels to find parts that do not fit or are worn out. |
Temperature Sensor | Compares pump and oil heat to find overheating or leaks. |
Pressure Gauge Monitoring | Watches pressure numbers for signs of trouble. |
If you see more than one warning sign and your tests show problems, plan to replace the pump soon. This keeps your excavator safe and helps you avoid bigger repairs later.
Safety and Preparation for Excavator
Safety Precautions
You must follow safety steps before you start working on your excavator. These steps protect you from injury and keep your hydraulic system clean.
Release hydraulic system pressure. Always check your service manual for the right way to do this. High-pressure fluid can cause serious harm.
Drain hydraulic oil. Place an oil pan under the pump. Disconnect the hoses and let the oil drain out. Dispose of the oil in line with local rules.
Disconnect all hoses and fittings. Remove each hydraulic hose and fitting from the pump. Cover open hoses and ports to keep dirt out.
Disconnect the battery. This stops accidental starts and keeps you safe from electric shock.
Tip: Never rush through safety steps. Take your time and double-check each step before you move on.
PPE and Tools
You need the right gear and tools to replace your hydraulic pump safely. Wearing personal protective equipment (PPE) keeps you safe from oil spills and flying debris.
PPE Checklist | Tools and Materials Needed |
|---|---|
Safety glasses 👓 | Wrenches (standard and hydraulic) |
Work gloves 🧤 | Socket set |
Steel-toe boots 🥾 | Torque wrench |
Protective clothing | Oil pan |
New hydraulic oil |
You should gather all tools before you begin. This helps you work faster and avoid mistakes. Make sure your workspace is clean and free of clutter. If you keep your tools organized, you can focus on the pump replacement and avoid accidents.
Note: Always use tools that fit your excavator model. Using the wrong tool can damage parts or cause injury.
Pre-Replacement Steps
Before you work on your excavator, follow some important steps. These steps help keep you safe. They also protect your machine from damage. If you do these steps, your hydraulic pump replacement will go well.
Depressurize System
You need to let out all pressure from the hydraulic system. High-pressure fluid can hurt you badly. Always look at your service manual for the right way.
When you take apart a hydraulic pump, make sure the system has no pressure and is not connected to power.
Turn off the engine first. Put all controls in neutral. Wait for the system to cool down. This makes sure there is no pressure left. Never skip this step.
Drain Hydraulic Oil
After you let out the pressure, drain the hydraulic oil. Put a big oil pan under the pump. Take out the drain plug or the lowest hose. Let all the oil come out. Clean up any spills right away. Throw away old oil the way your town says. Fresh oil helps your hydraulic system work well when you finish.
Disconnect Battery
Take off the battery before you remove the pump. This stops the engine from starting by mistake. Use a wrench to loosen the battery ends. Remove the negative cable first. Then take off the positive cable. Keep the cables away from metal things. This keeps you safe from electric shock and protects your excavator.
Tip: Always check that the battery is off before you work on the hydraulic pump.
If you do these steps, you lower your chance of getting hurt. You also keep your hydraulic system clean. Good preparation helps you finish faster and keeps your excavator working well.
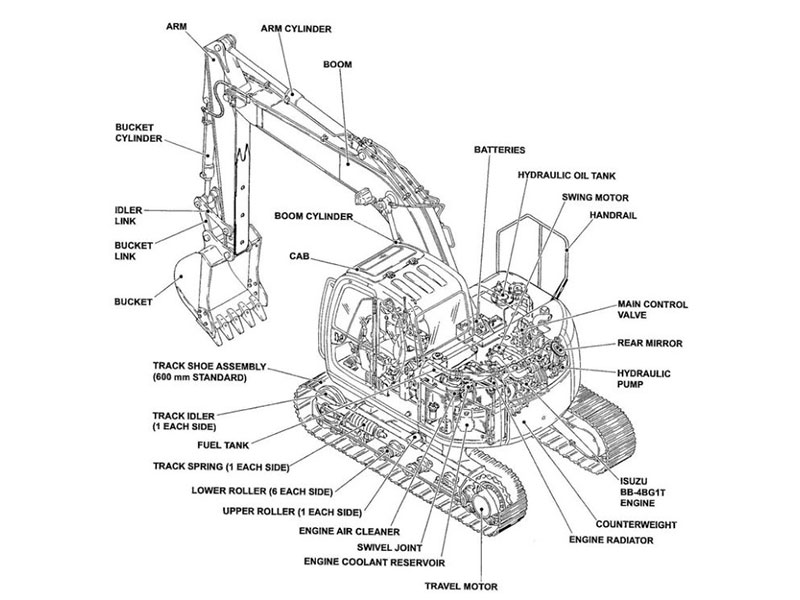
Accessing Hydraulic Pump
Remove Covers
You need to get to the hydraulic pump inside your excavator. First, gather your tools and safety gear. Put on safety glasses, gloves, a hard hat, and safety-toed shoes. These keep you safe from sharp edges and falling parts.
Read your excavator’s service manual before you start. The manual tells you where the hydraulic pump is and how to open the engine compartment. Most pumps are close to the engine. Open the covers or panels slowly and with care.
Note: Never take off covers if the hydraulic system has pressure. Hydraulic equipment under pressure is very dangerous. If you skip this step, you could get hurt or cause sudden movement.
When you take off the covers, look for the relief and control valves near the pump. These parts help control the hydraulic system. Always make sure all pressure is gone before you touch anything.
Risks of improper cover removal:
Hydraulic pressure can make things move quickly.
Small leaks in hoses can spray harmful fluid.
Taking off parts while the machine runs can cause accidents.
Ruptures may happen if you do not let out pressure first.
Disconnect Hoses
After you take off the covers, you will see hydraulic hoses attached to the pump. You must disconnect these hoses the right way to stay safe and keep the system clean.
Follow these steps:
Turn off the power and make sure there is no pressure in the hydraulic system. Open the pressure relief valve to let out any leftover pressure.
Use two wrenches to hold the hose and loosen the connector slowly. This stops fluid from bursting out quickly.
When you disconnect a hose, cover both ends with clean caps or plugs. This keeps dirt and dust out of the hydraulic system and stops fluid from leaking.
Tip: Always keep your work area clean. Covering hose ends right away helps stop dirt from getting in and protects your hydraulic pump.
If you follow these steps, you can reach the pump safely and get ready for the next part of the replacement process.
Replacement Excavator Hydraulic Pump Process
Remove Old Pump
You need to remove the old pump before you start installing hydraulic pumps. Begin by cleaning the area around the replacement excavator hydraulic pump. Dirt and debris can damage your hydraulic system if they get inside. Use a brush or cloth to wipe away dust and grime. Keep your tools clean. Grease and rust can cause problems if they enter the system.
Follow these steps to remove the old pump:
Disconnect all hydraulic hoses and fittings. Cover open hose ends with clean caps to prevent contamination.
Loosen the mounting bolts with the correct wrench. Remove each bolt slowly and keep them in a safe place.
Lift the old pump out of its position. Use a hoist or get help if the pump is heavy.
Tip: Never open fluid containers near dirty areas. Always follow a strict fluid transfer process to keep your hydraulic system clean.
Install New Pump
You need to install the new replacement excavator hydraulic pump with care. Choose a high-quality pump from YNF Machinery for best results. Place the new pump on the prepared mounting surface. Make sure it lines up with the bolt holes.
Here is a step-by-step guide for professional hydraulic pump installation:
Secure the pump to the mounting surface. Use the manufacturer’s guidelines for torque and fastener types. Tighten bolts to the correct specification to prevent movement and vibration.
Align the pump carefully. Check that the inlet and outlet ports match the hydraulic lines.
Use a torque wrench to tighten each bolt. Do not overtighten. Overtightening can damage the pump housing or fittings.
Bolt Specification | 4.8 | 5.8 | 8.8 | 10.9 | 12.9 |
|---|---|---|---|---|---|
Diameter x Pitch mm | kN | Nm | kN | Nm | kN |
3 x 0.5 | 1.2 | 0.9 | 1.5 | 1.1 | 2.3 |
4 x 0.7 | 2.1 | 1.6 | 2.7 | 2.0 | 4.1 |
5 x 0.8 | 3.5 | 3.2 | 4.4 | 4.0 | 6.7 |
6 x 1 | 4.9 | 5.5 | 6.1 | 6.8 | 9.4 |
7 x 1 | 7.3 | 9.3 | 9.0 | 11.5 | 13.7 |
8 x 1 | 9.9 | 14.5 | 12.2 | 18.0 | 18.9 |
9 x 1.25 | 9.3 | 13.6 | 11.5 | 16.8 | 17.2 |
10 x 1.25 | 15.8 | 28.0 | 19.5 | 35 | 30 |
10 x 1.5 | 14.5 | 26.6 | 18 | 33 | 27 |
12 x 1.25 | 23.8 | 50 | 29 | 62 | 45 |
12 x 1.75 | 21.3 | 46 | 26 | 56 | 40 |
14 x 1.5 | 32 | 79 | 40 | 96 | 61 |
14 x 2 | 29 | 73 | 36 | 90 | 55 |
16 x 1.5 | 43 | 121 | 54 | 150 | 82 |
16 x 2 | 40 | 113 | 50 | 141 | 76 |
18 x 1.5 | 57 | 178 | 70 | 220 | 110 |
18 x 2.5 | 49 | 157 | 60 | 194 | 95 |
20 x 1.5 | 72 | 248 | 89 | 307 | 140 |
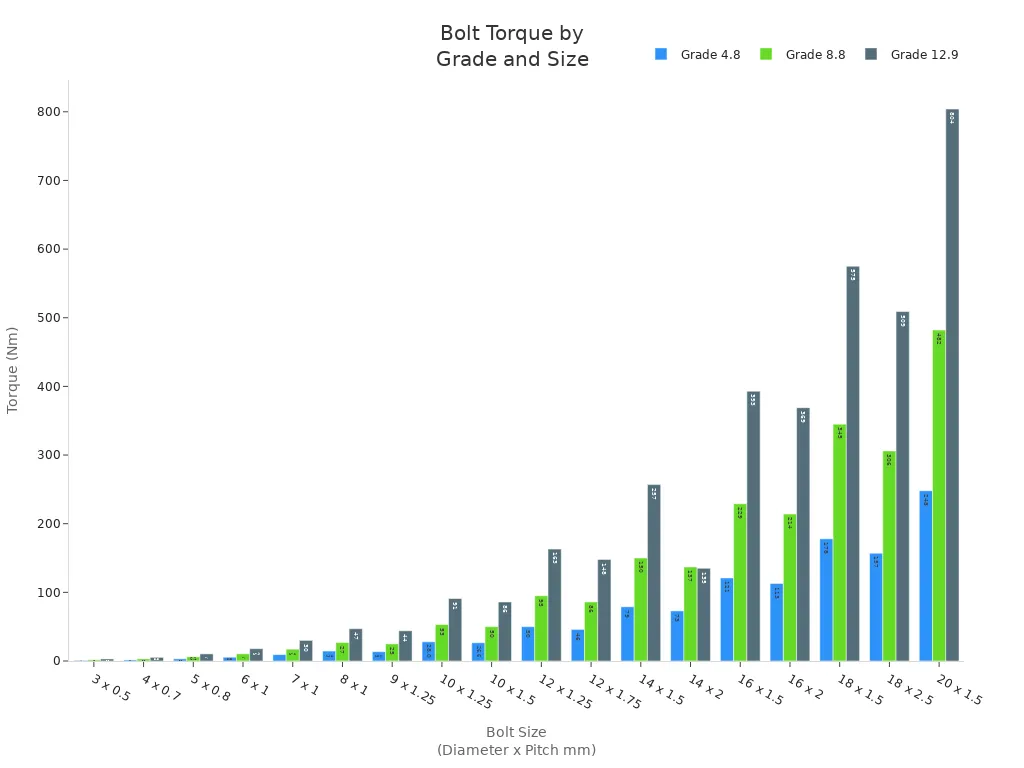
Note: Always use the correct torque for each bolt size. This keeps your replacement excavator hydraulic pump secure and working well.
Reconnect Lines
You need to reconnect the hydraulic lines after installing hydraulic pumps. Attach each line to the correct port on the new pump. Make sure you use the right fittings and hoses for your excavator. Tighten each connection securely. Do not overtighten, as this can damage the fittings.
Follow these steps:
Reattach all hydraulic lines carefully.
Check that each line is tight and secure. This helps prevent leaks and keeps your hydraulic system strong.
Alert: Always cover open hoses until you are ready to connect them. This stops dirt from getting inside and protects your replacement excavator hydraulic pump.
Check for leaks after you finish reconnecting the lines. Look for drips or wet spots around the fittings. If you see a leak, tighten the connection or replace the fitting. Good connections help your pump work well and keep your excavator safe.
YNF Machinery supplies reliable replacement excavator hydraulic pumps. Choosing a trusted supplier helps you avoid problems and makes professional hydraulic pump installation easier.
Refilling and Bleeding System

Add Hydraulic Fluid
You need to refill the hydraulic system before you start the excavator. Use clean, high-quality hydraulic oil that matches your machine’s requirements. Check your service manual for the correct type and amount. Open the hydraulic reservoir cap slowly to avoid pressure buildup. Pour the oil into the reservoir using a funnel to prevent spills. Fill the tank until the oil reaches the recommended level on the dipstick or sight glass.
Tip: Always keep the area around the reservoir clean. Dirt can enter the system and cause damage to the hydraulic pump.
After filling, check for leaks around the pump and hoses. Tighten any loose fittings if you see drips. Never overfill the reservoir. Too much oil can cause pressure problems in the hydraulic system.
Bleed Air
Air trapped in the hydraulic system can cause slow or jerky movement. You must remove this air to keep your excavator running smoothly. Follow these steps to bleed air from the system:
Park the excavator on firm, level ground. Turn off the engine and wear your PPE.
Lower the bucket or arm to the ground. This keeps the machine stable.
Find the bleed points on the hydraulic pump. Your manual will show you where they are.
Gather your tools and a container to catch any hydraulic fluid.
Loosen the bleed valve slowly. Let the air escape until you see a steady flow of oil.
Watch the fluid level in the reservoir. Add more oil if needed to keep it at the right level.
After bleeding, start the excavator and test all movements. Make sure the hydraulic system works without noise or hesitation.
Note: Bleeding air is important. If you skip this step, the pump may not work well and the excavator could get damaged.
Testing and Inspection
Startup and Leak Check
After you finish installing the new hydraulic pump, you need to check your work. This step helps you find leaks and make sure the hydraulic system is safe. Follow these steps before you start the excavator:
Spin the pump by hand to check that it moves freely.
Inspect the couplings and seals for any signs of wear or leaks.
Take a small oil sample and check the oil level in the reservoir.
Look at all hoses, clamps, and connections. Make sure they are tight.
Double-check that all valves and filters are open and clean.
Prime and vent the pump to remove any trapped air.
Inspect the base to see if the mounting bolts are tight and the pump sits level.
Start the hydraulic system and watch closely for leaks.
Tip: Always keep a clean rag nearby. Wipe away any oil so you can spot new leaks quickly.
If you see oil dripping or spraying, turn off the machine right away. Tighten the fittings or replace any damaged parts. Never ignore a leak. Even a small leak can cause big problems for your excavator.
Performance Test
Once you confirm there are no leaks, you need to test how well the hydraulic pump works. These tests help you see if the pump meets the needs of your machine. Use the table below to guide your checks:
Performance Test | Description |
|---|---|
Pressure Testing | Measure the hydraulic pressure. Make sure it matches the numbers in your service manual. |
Visual Inspection | Look for signs of wear, rust, or leaks. Check all parts of the hydraulic system. |
Performance Evaluation | Watch how the pump works during normal use. Make sure it runs smoothly and moves the excavator parts as expected. |
Note: If you notice strange noises, slow movement, or low pressure, stop the test. Check the hydraulic system again for problems.
Testing and inspection help you catch issues early. You keep your excavator safe and working well when you follow these steps.
Maintenance Tips
Routine Inspection
Checking your excavator often helps it work well. Look at it every day to find problems early. Check the hydraulic lines and hoses for leaks or cracks. Look for bulges too. Make sure engine oil, hydraulic oil, and coolant are full. If any are low, fill them up right away. Look at the hydraulic belts and hoses for cracks. Change any parts that look old or worn out. Keep all filters clean. This includes fuel, hydraulic, and air filters.
Each month, check your machine more closely. Watch the temperature of the hydraulic fluid. If it gets too hot, the pump can wear out faster. Look at the color and feel of the fluid. If it looks dirty or milky, change it. Test the system pressure to see if the hydraulic pump works right. Change the hydraulic filters every 250 hours. Test the fluid for dirt every 500 hours. Plan to change all the fluid every 1,000 hours.
Tip: Watch for slow movement, odd noises, or hot fluid. These signs mean there could be a problem with the hydraulic system.
Prevent Future Issues
You can stop many hydraulic problems before they start. Most problems happen because the fluid is dirty or old. Clean fluid helps your pump and system last longer. Always use the hydraulic fluid the maker says to use. Check the fluid often and change it when needed. Use good filters that catch tiny dirt pieces. Filters with a 3-micron rating work best. Keep the system clean by following ISO 4406 rules at 18/16/13 or better.
Here are steps to help you avoid problems:
Make a plan to check your machine often.
Check the temperature, pressure, and flow rates a lot.
Use special breathers and monitors to keep water out.
YNF Machinery gives you good hydraulic pump parts and filters. Using trusted parts helps stop breakdowns and keeps your excavator working longer.
Note: Keeping things clean and checking often are the best ways to protect your hydraulic pump and save money on repairs.
You can change your excavator hydraulic pump safely if you follow each step. Always wear the right safety gear. After you finish, check for leaks. Doing regular checks on fluid and filters helps stop problems. This can keep your pump from wearing out, leaking, or getting too hot.
Maintenance Task | How Often | What Happens If You Skip It |
|---|---|---|
Fluid Inspection | Every 100-200 hrs | The pump can get too hot and break |
Filter Replacement | Every 500 hrs | The pump wears out faster and works less |
System Inspection | Every 1000 hrs | You might have big, expensive problems |
If you keep up with these checks, your machine will break down less. You will also save money in the long run.
FAQ
How do you know your hydraulic pump needs replacement?
You see slow movement, hear strange noises, or notice leaks near the pump. You check the pressure and oil quality. If problems continue after basic checks, you should plan to replace the pump.
What safety gear should you wear during pump replacement?
You need safety glasses, gloves, steel-toe boots, and protective clothing. These items protect you from oil spills, flying debris, and sharp edges. Always wear your gear before you start working.
Can you reuse old hydraulic oil after pump replacement?
You should not reuse old hydraulic oil. Old oil may contain dirt or water. Fresh oil keeps your new pump clean and helps it last longer. Always follow your excavator’s manual for oil type.
Where can you buy a reliable replacement hydraulic pump?
You can buy a reliable replacement hydraulic pump from YNF Machinery. They offer quality parts that fit many excavator models. Choosing trusted suppliers helps your machine work better and last longer.
What should you do if you see a leak after installing the new pump?
You need to turn off the excavator right away. Check all hose connections and fittings. Tighten any loose parts. Replace damaged seals or hoses. Never ignore leaks because they can cause bigger problems.