You might see problems with your Bobcat 322 mini excavator if the swivel joint does not work well. The swivel joint is very important for safety and good work. Many owners find problems with the swivel after 1000 hours of use.
Swivel joint failure or leaks happen a lot.
A Bobcat mechanic says this often happens after 1000 hours.
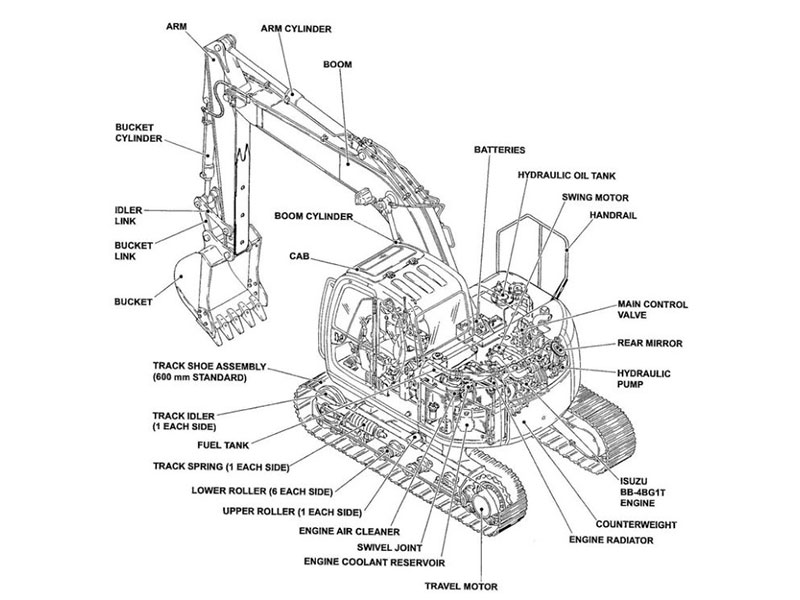
Look at the Bobcat 322 mini excavator swivel joint parts diagram to find where it is before you start fixing it.
Key Takeaways
Check the swivel joint every 250 hours. This helps you find leaks and damage early. Regular checks keep your excavator safe and working well.
Get the tools you need like a socket set, hydraulic line caps, and safety gear before you start. Being ready makes the work easier and safer.
Hold up the excavator arm with a jack and wood block before you take off the swivel joint. This step stops accidents and keeps the machine steady.
Put the swivel joint back together carefully after you change seals and o-rings. Doing this right stops leaks and helps it last longer.
Test the hydraulic system for leaks after you finish. Checking the connections helps you avoid expensive fixes and keeps your excavator working well.
Identify Swivel Joint Issues
Symptoms of Failure
You may notice several signs when your Bobcat 322 mini excavator has a problem with the swivel joint. Watch for these common symptoms:
The travel motors feel weak, especially on one side.
The excavator blade does not work as well as before.
Hydraulic motors do not get enough fluid because of leaks in the seals.
Sometimes, you see a loss of power in the travel motors before you spot any leaks.
A leaking swivel can confuse you because the symptoms look like other problems.
If you see any of these issues, you should check the swivel joint right away. Swivel joint failure can make your machine unsafe and less effective.
Inspection Steps
You can use a few simple steps to check for problems. The table below shows the best ways to inspect your Bobcat 322 mini excavator:
Diagnostic Method | Description |
|---|---|
Check for leaks | Look at the seals on the swivel joint for any signs of leaking fluid. |
Case drain flow test | Disconnect the case drain line and watch the fluid flow. Too much flow means trouble. |
Monitor motor performance | Test the travel motors. Weakness may point to a problem with the swivel. |
Take your time with each step. If you find leaks or weak performance, you may need to replace the seals or the whole joint.
bobcat 322 mini excavator swivel joint parts diagram
You need to find the exact location of the swivel joint before you start repairs. The bobcat 322 mini excavator swivel joint parts diagram helps you see every part and connection. You can find this diagram in the official parts catalog for your machine. The bobcat 322 mini excavator swivel joint parts diagram shows the seals, bolts, and hydraulic lines. Use the bobcat 322 mini excavator swivel joint parts diagram to plan your work and avoid mistakes. If you need replacement parts, YNF Machinery offers reliable options for your Bobcat 322 mini excavator swivel joint.
Preparation and Safety
Tools Needed
Before you start, gather all the tools and equipment you need. Having the right tools makes the job safer and faster. Here is a checklist to help you get ready:
Socket set and wrenches (metric and standard)
Hydraulic line caps and plugs
Clean rags or shop towels
Pry bar
Jack and sturdy wood block
Safety gloves and goggles
Drip pan for hydraulic fluid
Torque wrench
Tip: You can find quality replacement parts and tools for your Bobcat 322 at YNF Machinery.
Safety Precautions
Safety comes first when you work on heavy equipment. Always follow these steps to protect yourself and your machine:
Park the excavator on a flat, stable surface.
Lower the bucket and blade to the ground.
Turn off the engine and remove the key.
Release any pressure in the hydraulic system by moving the controls.
Wear gloves and safety goggles to protect your hands and eyes.
Use hydraulic line caps and plugs to stop leaks and keep dirt out.
Note: Never work under a raised arm or boom without proper support. Hydraulic systems can move suddenly and cause injury.
Support the Arm
You must support the excavator arm before you remove the swivel joint. This step keeps the machine stable and prevents accidents.
Place a sturdy wood block under the arm.
Use a jack to lift the arm slightly, just enough to take the weight off the swivel joint.
Double-check that the arm cannot move or fall.
Supporting the arm gives you a safe workspace. It also protects the hydraulic system from damage during the repair. Always check the stability before you begin any work.
Remove Swivel Joint
Access Points (Above and Below)
You need to reach the swivel joint from both above and below the excavator. Start by opening the access panels on the top of the machine. Look for the swivel joint near the center of the undercarriage. You may see hydraulic lines and mounting bolts around the area. Use a flashlight to check for dirt or debris. Clean the area before you begin removing the swivel. This step helps you see all the parts and prevents problems later.
Tip: Take photos of the area before you start. These pictures help you remember where each part goes when you reassemble the machine.
Disconnect Hydraulic Lines
Begin disconnecting hydraulic lines from the swivel joint. Use line caps and plugs to keep fluid from leaking. You must label each line as you remove it. This step makes it easier to reconnect them later. Place a drip pan under the joint to catch any hydraulic fluid. Wear gloves and goggles to protect yourself. You may need a wrench to loosen the fittings. Work slowly and check for pressure in the lines before you remove them.
Step | Action | Safety Reminder |
|---|---|---|
1 | Loosen hydraulic fittings | Wear gloves and goggles |
2 | Cap and plug each line | Prevent fluid leaks |
3 | Label each line | Avoid confusion during reassembly |
Remove Mounting Bolts
After disconnecting hydraulic lines, you can start removing the mounting bolts. Use a socket set to loosen each bolt around the swivel joint. Remove the bolts one at a time. Keep them in a safe place. You may need a pry bar to help separate the joint from the frame. Check for any hidden bolts or brackets. Removing the swivel joint pump requires patience and attention to detail. Do not rush this step.
Note: Some bolts may be tight or rusted. Spray them with penetrating oil if needed.
Use Jack and Wood Block
Support the swivel joint with a jack and a sturdy wood block. Lift the joint slightly to take the weight off the mounting area. This step keeps the joint stable while you finish removing the swivel. Make sure the jack sits on a flat surface. Double-check that the wood block does not slip. You must keep the area safe and prevent the joint from falling. Removing the swivel becomes easier when you use proper support.
Place the jack under the swivel joint.
Slide the wood block between the jack and the joint.
Lift slowly and watch for movement.
Remove the joint once it feels loose and safe to handle.
bobcat 322 mini excavator
You have now completed the main steps for removing the swivel joint from your bobcat 322 mini excavator. Removing the swivel takes time and care. Always follow safety rules and use the right tools. If you need replacement parts, YNF Machinery offers reliable options for your excavator. You can contact them for swivel joint kits and hydraulic seals. Removing the swivel is a key part of keeping your machine running well.
Inspect and Replace Seals
Disassemble Joint
You need to take apart the swivel joint to reach the seals and o-rings inside. Start by placing the swivel on a clean workbench. Use a wrench to remove any bolts or retaining rings. Keep each part in order as you remove it. This step helps you remember how to put everything back together. You may see old hydraulic fluid or dirt inside the swivel. Wipe away any grime with a clean rag. Always clean mating surfaces before you install new parts. This step helps prevent leaks and keeps the swivel working well.
Tip: Take photos during disassembly. These pictures help you during reassembly and make it easier to repair a leaker in the future.
Check Seals and O-Rings
Now you can inspect seals and o-rings for damage. Look for cracks, cuts, or signs of wear on each seal. If you see any damage, you must replace damaged parts right away. Old or worn o-rings can cause leaks and make the excavator unsafe. Use a small pick or screwdriver to remove the old o-rings. Be careful not to scratch the metal surfaces. Always check the fitting o-ring for a tight fit. If you find any hard or brittle seals, replace them with new ones.
Here is a table with the recommended replacement part number for the Bobcat 322 swivel joint:
Replacement Part Number | Application Models |
|---|---|
6664903 | Bobcat 220, 320, 322 |
You can get these replacement seals and o-rings from YNF Machinery. They offer reliable parts for your repair.
Reassemble Components
After you replace the o-rings and seals, you need to reassemble the swivel. Place each part back in the correct order. Make sure every seal sits flat in its groove. If you miss a step, you may cause leaks later. Tighten each bolt to the correct torque. Use a torque wrench if you have one. Double-check that all seals and o-rings are in place. Clean mating surfaces again before you finish. This step helps prevent leaks and keeps the swivel joint working for a long time.
Note: Careful reassembly is the best way to prevent leaks. Take your time and check your work.
bobcat 322
When you repair the swivel joint on your bobcat 322, you protect the whole hydraulic system. New seals and o-rings help your excavator run smoothly. If you replace damaged parts and follow each step, you can prevent leaks and avoid costly repairs. Always use the right replacement parts and clean every surface. YNF Machinery can supply you with the correct seals and o-rings for your bobcat 322. Good maintenance keeps your excavator safe and strong.
Install and Test
Install New Joint
You can start installing the new swivel joint by placing it in the correct position on your excavator. Make sure the mounting area is clean and free of debris. Align the swivel with the bolt holes. Use a jack and a sturdy wood block to support the joint while you secure it. Tighten each mounting bolt by hand first, then use a torque wrench to finish. Check that the swivel sits flat and does not shift. Warming the seals before installation can help them fit better. This step helps prevent leaks and ensures a good seal.
Tip: Take your time during installation. A careful approach helps you avoid mistakes and keeps your excavator safe.
Reconnect Hydraulic Lines
You need to reconnect the hydraulic lines to the new swivel. Mark every hose before disconnecting so you can match each one to the correct fitting. Use a jack to support the bucket, which helps you align the hoses more easily. Attach each line and tighten the fittings. After you finish, check for leaks around every connection. Clean the area to make it easier to spot any problems. Proper reconnection keeps the hydraulic system working well.
Mark hoses before disconnecting
Use a jack for better alignment
Tighten fittings securely
Check for leaks after reconnecting
Test for Leaks
After you install the new swivel and reconnect the hydraulic lines, you should test the system for leaks. Start the engine and let the hydraulic system build pressure. Watch each connection closely. Look for any signs of fluid escaping. If you see a leak, turn off the engine and fix the problem before using the excavator. Testing for leaks protects your machine and helps you avoid costly repairs.
Troubleshooting
If you notice leaks after installation, you need to find the source quickly. Clean the area around the leak to help you see where the fluid comes from. Check for loose hoses or damaged O-rings. Sometimes the leak comes from a fitting, but it can also come from the swivel itself. If you cannot fix the leak easily, consider the complexity of the repair. You may need to disassemble the joint again. YNF Machinery offers reliable parts and support if you need help with troubleshooting or replacement.
You finished replacing the swivel joint by following each step. Checking your work and installing parts the right way helps your excavator stay safe. Doing regular maintenance makes your machine strong and stops problems from happening later. Always read the operator’s manual for more information. If you need help, talk to an expert or use trusted parts from YNF Machinery.
Part Name | SKU | Price (Incl. Tax) | Models Supported | Previous Part Number |
|---|---|---|---|---|
Swivel Joint | 6803396 | €1,254.49 | 220, 320, 322 | 6800517 |
FAQ
How often should you check the swivel joint on your Bobcat 322?
You should inspect the swivel joint every 250 hours of use. Look for leaks, loose bolts, or worn seals. Regular checks help you catch problems early and keep your machine running safely.
What tools do you need for a swivel joint replacement?
You need a socket set, wrenches, hydraulic line caps, a jack, a wood block, safety gloves, and goggles. Having the right tools makes the job safer and faster.
Can you replace the swivel joint without professional help?
You can replace the swivel joint if you follow each step carefully. Use the operator’s manual for guidance. If you feel unsure, ask a professional for help.
Where can you buy reliable swivel joint parts?
You can buy reliable swivel joint parts from YNF Machinery. They offer quality seals, o-rings, and complete kits for your Bobcat 322.
What should you do if you see a hydraulic leak after installation?
If you see a leak, stop the excavator and check all fittings and seals. Tighten any loose connections. Replace damaged o-rings if needed. Test the system again before using the machine.