If you want a safe and easy way to change your monitor display excavator, always put safety first. Use the right tools for the job and make sure all parts are compatible with your excavator model. Take time to prepare before you start working on the monitor display excavator. Gather your tools and carefully read each step. Handle all components with care to prevent any damage.
Key Takeaways
Always stay safe by wearing the right safety gear. Turn off the excavator before you work on the monitor display.
Get the correct tools and pick parts that fit well. OEM parts are best for a smooth and safe replacement.
Take out the old display and wires with care. Do not break the connectors. Put in the new display tightly and hook up the battery the right way.
Use service mode to set up and adjust the new monitor display. This helps it work well and keeps the operator comfortable.
If you have trouble or face hard problems, call a professional for help. This keeps you and your machine safe.
Tools and Parts
Essential Tools
You must have the right tools to change an excavator monitor display safely. Get all your tools ready before you start. This helps you work faster and make fewer mistakes.
Phillips and flathead screwdrivers
Socket wrench set
Plastic trim removal tools
Multimeter for electrical checks
Clean, dry cloth for wiping connectors
Zip ties for cable management
Tip: Use plastic trim tools so you do not scratch the console. Keep your tools neat and close by to save time.
OEM and Compatible Parts
Picking the right replacement part is very important for a good repair. You can use an original equipment manufacturer (OEM) part or a compatible aftermarket display. OEM parts, like the SANY excavator monitor displays, are very reliable and come in real packaging. These displays fit well and pass tough quality tests, so many people trust them.
Some compatible displays, like those from SINOCMP, work with brands such as CAT, Komatsu, Volvo, and Hitachi. These parts usually cost less than OEM parts and have a 12-month warranty. Many people find them simple to put in because they are pre-programmed for plug-and-play use. SINOCMP also ships quickly and helps customers worldwide, so these displays are good for fast repairs.
The KOBELCO YY59S00009F1 monitor display panel is another strong OEM part. It is made for hard jobs with waterproof connectors and anti-glare surfaces. This display comes with technical support and a warranty, so you know it will last.
Monitor failures often happen from moisture, dust, or connector corrosion. Sometimes, a firmware update can fix the issue without new hardware. Always check your excavator’s manual to make sure the new display will work before you buy it.
Safety First
Personal Protective Equipment
You need to keep yourself safe before you work on your excavator’s monitor display. The right personal protective equipment, or PPE, helps protect you from electrical dangers, things that might fall, and flying bits. Always look at your gear to see if it is broken before you use it. Make sure your gear fits you well and feels good to wear.
Here are the PPE items you should use when working on excavator electrical systems:
Hard hat: Pick a Class B hard hat for the best electrical safety. This kind keeps your head safe from falling things and electric shocks.
Eye and face protection: Put on safety glasses or goggles. These keep your eyes safe from dust, sparks, and flying bits.
Gloves: Wear gloves made for electrical jobs. They keep your hands safe from shocks and sharp things.
High-visibility clothing: Wear bright clothes with reflective strips. This helps people see you, even in busy or dark places.
Safety boots: Choose boots with steel toes and electrical safety features. These keep your feet safe from heavy things and electricity.
Hearing protection: Use earplugs or earmuffs if it is loud where you work.
Note: PPE only works if you use it the right way. Always follow the maker’s rules for using and caring for your gear.
Power Down Procedures
You must always turn off your excavator before you touch any electrical parts. This keeps you safe from electric shocks and stops damage to the new monitor display.
Follow these steps to turn off your machine:
Park the excavator on flat ground. Lower the bucket and turn off the engine.
Take the key out of the ignition. Put it in your pocket so no one can start the machine by mistake.
Unhook the battery. Use a wrench to take off the negative cable first, then the positive cable.
Wait a few minutes. This lets any leftover energy leave the system.
Tip: Never skip the power down steps. Even a little electricity can hurt you or break your new display.
Accessing the Excavator Display Panel
Remove Console Covers
To get to the excavator display panel, you must take off the console covers. First, make sure your excavator is on flat ground. Lower the bucket and turn off the engine. Always disconnect the battery before touching any electrical parts. Put on your safety glasses and gloves to stay safe.
Here are the steps to take off the covers:
Use a 13mm wrench to take off the battery ground cable. This keeps the machine safe from power.
Take off the joystick boot so you can reach the console cover.
Lift the console cover. Some models, like Komatsu, need a wrench to remove two 10mm bolts.
Hold the cover out of the way so you have space to work. Put bolts and washers somewhere safe.
Move the cover gently to loosen it. You might not need to take out every bolt.
Take off the throttle dial and put it aside.
Push the joystick boot through the hole in the cover and set the cover aside.
If the key switch will not come out, do not force it. If needed, start taking off the side covers.
Tip: Be gentle with all wiring and connectors. Pulling or bending wires can break the excavator display panel or the display panel controller.
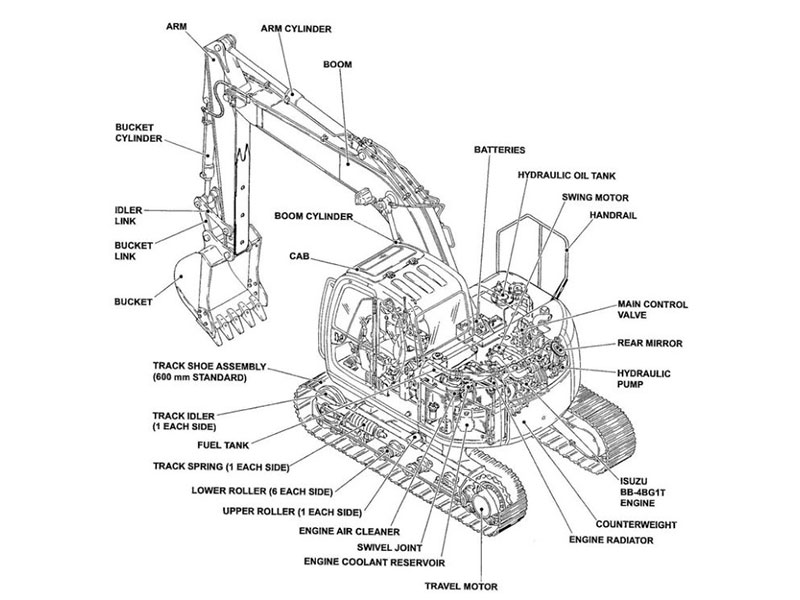
Locate Monitor Display Excavator
Most excavators have the monitor display excavator inside the operator’s cab. You will see the excavator display panel in the middle, close to the main controls. For example, the DX50Z-7 Mini Excavator has a color LCD monitor in the cab. This spot lets you see machine data and controls easily.
Caterpillar and other big brands also put the display panel controller in the center of the cab. You can get to it by taking off the console covers and side panels. The display panel controller is usually near buttons for menus, backup cameras, and other features. Some cabs have consoles that tilt up or touchscreen monitors for easier access.
When you find the excavator display panel, look for extra covers or brackets. Take them off carefully. Always keep screws and small parts safe. This helps you not lose anything while you replace the monitor display excavator.
Step-by-Step Replacement Process
Disconnect Battery
Begin by disconnecting the battery. This keeps you safe from shocks. It also protects the monitor display excavator from damage. Always take off the negative cable first. Then remove the positive cable. Use tools with insulation. Keep metal things away from the battery.
Alert: Do not skip this step. If you short the battery, it can start a fire or cause burns. You could get badly hurt. Disconnecting the battery also keeps the wiring harness safe from shorts.
Remove Old Display
Now, take out the old display. First, loosen the screws or bolts holding it. Pull the display forward gently. This lets you reach the wiring harness. Carefully unplug all connectors. Do not pull or twist the wires. If you see dirt or rust, clean the connectors with a dry cloth.
Many people have problems at this step. The table below lists common issues and fixes:
Challenge Encountered | How to Address It |
|---|---|
No display screen despite other functions working | Check all fuses in the fuse box |
Wiring harness and connectors corrosion or damage | Inspect and clean wiring connections; check for loose or damaged connectors |
Faulty display unit | Test power supply to the monitor with a multimeter; replace the monitor if necessary |
Backup mode switch not set to AUTO | Make sure the backup mode switch (under right armrest cover) is set to AUTO |
Need for ECM updates | Only dealers can perform ECM flashing; contact your dealer if needed |
Complexity of wiring and connector locations | Ask your dealer for a wiring schematic if you need detailed circuit testing |
Prevent recurrence | Clean connectors and check fuse boxes regularly |
Tip: Be gentle with the wiring harness. Broken or bare wires can cause shorts or fires. They can also make the equipment stop working. Always tie down the wiring so it does not shake or rub.
Install New Monitor Display Excavator
Check that your new monitor display excavator matches your machine.
Make sure it fits your excavator’s brand and model.
See if it is pre-programmed for plug-and-play.
Ask your supplier for help if you are not sure.
Slide the new display into place. Plug in each wiring harness tightly. Do not solder wires where there is vibration. Use crimp connectors that seal out moisture. Tie the wires so they do not touch sharp or hot parts.
Note: Using an OEM display or trusted part helps avoid problems later. OEM parts usually last longer and fit better.
Reconnect and Test
Reconnect the battery. Attach the positive cable first, then the negative. Turn the key to ON. Watch the display as it starts up.
Make sure the monitor display excavator shows all menus and data.
Test all buttons and touch features.
If it does not turn on, check the fuses and wires again.
You might need to use the service menu to set up the new display. Follow your manual’s steps. Change the settings so the display works with your machine.
Callout: If you see error codes or the display does not work, check all connections again. Some problems need a dealer, especially for ECM updates.
DIY Replacement Steps Calibration
Enter Service Mode
You need to enter service mode to finish your diy replacement steps. Service mode lets you adjust and calibrate your new monitor display excavator. Each brand uses a different way to access this mode.
On many 320C series panels, press the ‘Menu’ key to open the main menu.
Use the ‘Down’ key to highlight ‘PREFERENCES.’
Press ‘OK’ to select it.
Scroll through menu items with the ‘Up’ and ‘Down’ keys.
Move within menu items using the ‘Left’ and ‘Right’ keys.
Press the ‘Setting’ key to set the current menu.
Use ‘Cancel’ to exit or undo changes.
Press ‘OK’ to confirm your choices.
For Cat 320B models, hold the travel alarm cancel, fine control mode, and user mode switches together for two seconds. The display will show zeros and a blinking character. Enter the security code using the switches. After entering the code, hold the same switches again for two seconds. The service mode will turn on, and you can select calibration codes.
Tip: Some Cat machines use a Click Box. Ground the Service and Clear inputs at the same time. This scrolls through mode numbers. Release the ground to pick a mode. Service Mode is usually Mode 3.
Configure Settings
Once you enter service mode, you can set up your new display. You should create operator profiles and set access levels. Choose between a passcode, Bluetooth key, or smartphone app for identification. Assign each operator a level like guest, standard, or master.
Set up operator profiles with a four-digit passcode or Bluetooth key.
Adjust joystick patterns to match your style.
Change button functions for comfort.
Set hydraulic spool response for the right feel.
Calibrate Cat Payload if your machine uses it.
Define work settings for your job.
Personalize radio and HVAC settings.
Track attachments and usage hours with the Cat app.
If you run into problems, check for broken connector locks or damaged wires. High alternator voltage or failed sensors can cause the display to shut off. Make sure all connections are tight and clean.
You can complete these diy steps with patience and care. Take your time to follow each step. This will help you avoid common mistakes and get your excavator back to work.
Troubleshooting
Power or Display Issues
After you put in a new excavator display panel, problems might happen. These problems can make it hard to use your machine safely. Here are some things that can go wrong:
The power goes out or the display will not turn on.
The screen flickers or looks dim.
The back-light does not work at all.
The display turns off and on by itself.
The screen shows weird colors or pixels look wrong.
There are cracks or dead spots on the screen.
Most of these problems come from electrical issues. If the battery is weak, the display panel controller might not work. Blown fuses or loose wires can also cause trouble. Sometimes, water or dust gets inside and hurts the controller. Wires that are broken, pins that are bent, or connectors that are rusty can also make problems.
To fix these issues, check if the battery has enough charge. Make sure all the wires and connectors are tight and clean. Wipe the connectors with a dry cloth. If you see rust, put dielectric grease on the connectors. Use a weatherproof cover to keep the excavator display panel safe in wet or dusty places. If the screen is cracked or has dead spots, you might need a new display panel controller.
Tip: If you still have trouble, try updating the firmware or ask an expert for help. Sometimes, using a pre-programmed display panel controller fixes things quickly.
Error Codes and Diagnostics
If your display panel controller shows error codes, you need to know what they mean. These codes help you find out what is wrong with your excavator display panel.
First, look at all the wires and connectors. Make sure nothing is loose or broken. Check the battery voltage and fuses to see if the display panel controller gets power. Use a diagnostic scanner to read the error codes. Many brands like Cat, Volvo, and Komatsu have special code lists for these tools.
If you see an error, try to reset the controller. This can help it talk to the excavator display panel again. Update the firmware if you can. Many display problems go away after a software update. If the screen is cracked or has dead spots, you may need a new display panel controller.
Note: Keep your display panel controller safe from water and dust. Put dielectric grease on connectors to stop rust. If you cannot fix the problem, a pre-programmed controller can often get your excavator working again.
Tips for Success
Use Original Parts
When you choose parts for your excavator monitor display, you want the best results. Using original parts gives you peace of mind. These parts come from the same company that made your machine. They fit perfectly and work as expected.
Original parts, like the Sany SY365H monitor, go through strict quality checks. You get a test report and even a video inspection.
These parts last longer because they use strong materials. You do not have to worry about early failure.
You can use original parts in many types of machines. They work well in different jobs and industries.
You get support and a warranty from the maker. This helps if you have any problems later.
Some people pick aftermarket parts to save money. Good aftermarket parts can help your machine run better and cost less. If you choose this route, check the quality, fit, and performance. High-grade aftermarket parts can last a long time and resist rust. Poor-quality parts can break early, cause more downtime, or make your machine less efficient.
Tip: Always check if the part matches your machine. A good fit means fewer problems and less time fixing things.
When to Call a Pro
You can do many repairs with diy steps, but some jobs need a professional. If you see error codes you do not understand, or if the new display does not work after you check all connections, call an expert. A pro has special tools and training. They can fix wiring, update software, or handle complex problems.
Call a pro if you see sparks, smoke, or burning smells.
If you cannot enter service mode or finish calibration, get help.
When you need to update the ECM or reset advanced settings, a dealer or technician should do it.
If you feel unsure at any step, it is safer to ask for help. This keeps you and your machine safe.
If you follow these steps, you can change your excavator monitor display safely. Check every connection two times before you finish. Make sure you do the calibration before you use your machine. Use OEM parts to get the best results. If you are not sure what to do, ask a professional for help. Planning ahead and paying close attention will help you stop most problems. 🛠️
FAQ
How do you know if your excavator monitor display needs replacement?
You may see a blank screen, flickering, or error codes. Sometimes, the display will not respond to buttons. If cleaning connectors does not help, you likely need a new monitor display.
Can you replace the monitor display yourself?
Yes, you can replace it if you follow safety steps and use the right tools. Always read your manual first. If you feel unsure, ask a professional for help.
What should you do if the new display does not turn on?
Check the battery and all wiring connections. Make sure you connected the harness tightly. Look at the fuses. If the problem stays, contact your dealer or a technician.
Do you need to calibrate the new monitor display?
Yes, you need to calibrate it after installation. Use the service mode to set up the display. This step helps your excavator work with the new monitor.
Will aftermarket displays work as well as OEM parts?
Some aftermarket displays work well and cost less. Always check if the part matches your excavator model. OEM parts usually last longer and fit better.