
Safety always comes first when you work on heavy equipment. You need the right tools and a clean workspace for any repair job. Many final drive experts recommend checking every part before you start. This helps you avoid mistakes and keeps your machine running longer. You can handle excavator final drive parts and repair with confidence. Whether you work in a shop or try this at home, you can follow these steps for a successful fix.
Key Takeaways
Always get your workspace ready with the right tools and safety gear before you start any repair.
Carefully disconnect hydraulic hoses and use plugs to stop dirt from getting in the system.
Look at all parts closely for damage and change any parts that are worn or broken.
Use the right lubrication and follow the service manual when you rebuild the final drive.
Test your excavator after the repair to check for leaks and make sure it works smoothly before you use it.
Preparation
Before you start any repair, you need to prepare your workspace and gather the right tools. Good preparation helps you avoid mistakes and keeps you safe.
Tools and Equipment
Start by collecting all the tools and equipment you need. You should use the right tools for the job because this makes your work easier and safer. Here is a list of important steps to help you choose the best tools:
Check the speed, power output, and fluid levels of your excavator. These numbers show how your machine works when it is healthy.
Watch these numbers while the machine runs. If you see changes, you may have a problem.
Look at the data to find signs of wear or low performance.
Use hydraulic system test equipment and other diagnostic tools to get more details about the system.
Use what you learn from the data to pick the right tools and plan your repair. This helps you avoid sudden breakdowns.
You will need basic hand tools like wrenches, sockets, and screwdrivers. You may also need a hydraulic hose plug kit, lifting straps, and a torque wrench.
Safety Gear
Safety should always come first. Wear gloves to protect your hands from sharp parts. Use safety glasses to keep dirt and oil out of your eyes. Steel-toed boots protect your feet from heavy objects. A hard hat is a good idea if you work under the machine.
Tip: Always double-check your safety gear before you start. Good gear can prevent serious injuries.
Workspace Setup
Clean the area around the final drive before you begin. Dirt and debris can get inside the drive and cause damage. Make sure your workspace has enough light and space to move safely. Place all your tools within easy reach.
Support the excavator securely with jack stands or blocks. Never rely on the hydraulic system alone to hold the machine. A stable setup keeps you safe and makes the repair easier.
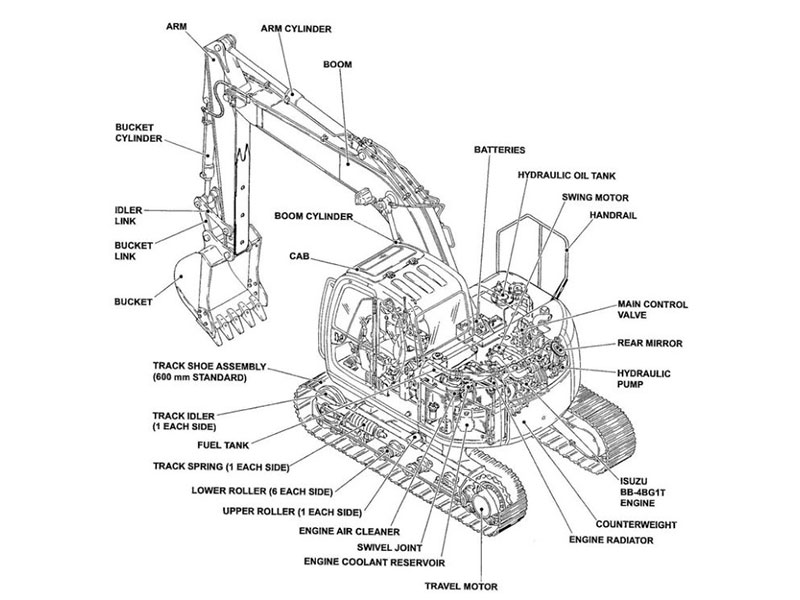
Removing Final Drive

Disconnecting Hydraulic Hoses
You need to disconnect the hydraulic hoses before you remove the final drive. Start by cleaning the area around the hose connections. Dirt can enter the system if you skip this step. Use a clean rag to wipe away any debris. Next, use the correct size wrench to loosen the hose fittings. Move slowly and watch for any pressure in the lines.
Tip: Always plug the hydraulic hoses with metal plugs right after you disconnect them. This step keeps dirt and moisture out of your hydraulic system. Contamination can cause serious damage later.
Place a drip pan under the hoses to catch any leaking fluid. Label each hose with tape or tags. This makes it easier to reconnect them later.
Removing Mounting Bolts
After you disconnect the hoses, you can remove the mounting bolts. Find the bolts that hold the final drive to the excavator frame. You should check your service manual for the exact locations and the correct torque specifications. Manuals often include diagrams that make this step easier.
Use a breaker bar or impact wrench to loosen the bolts. Remove them one at a time. Keep the bolts in a safe place so you do not lose them. Some bolts may be tight or rusted. Apply penetrating oil if needed.
Note: Never skip the service manual. It gives you important details about bolt patterns and torque values.
Lifting and Handling
The final drive is heavy. You should use lifting straps or a hoist to move it safely. Attach the straps to strong lifting points on the drive. Double-check that the straps are secure before you lift.
Work with a partner if possible. One person can guide the drive while the other operates the hoist. Move the final drive slowly and keep your hands clear of pinch points.
Safety Alert: Never try to lift the final drive by yourself. Always use proper lifting equipment to prevent injuries.
Disassembly and Inspection
Disassembling Components
You need to take apart the final drive carefully. Start by placing the final drive on a sturdy workbench. Use your service manual to guide you through each step. Remove the cover bolts with the correct socket. Set each bolt aside in a labeled tray. This helps you remember where each part goes.
Next, lift off the cover. You may need a soft mallet to loosen it. Do not use sharp tools that can damage the surface. Take out the gears, bearings, and seals one at a time. Lay each part in order on a clean cloth. This makes it easier to put everything back together later.
Tip: Take photos as you remove each part. These pictures help you during reassembly.
Cleaning Parts
You must clean and prep your final drive parts before you inspect them. Use a parts washer or a bucket with a safe cleaning solution. Scrub each part with a brush to remove grease and dirt. Dry the parts with a lint-free cloth. Make sure no water or cleaner stays on the parts.
A clean part lets you see cracks, chips, or wear. If you skip this step, you might miss a problem. Always keep your workspace tidy. Place cleaned parts on a fresh towel or tray.
Inspecting Excavator Final Drive Parts and Repair Needs
Now you can check each part for damage. Look for signs of wear, such as pitting, scoring, or cracks. Spin the bearings in your hand. They should move smoothly without noise. Check the gears for broken teeth or sharp edges. Inspect the seals for cuts or hard spots.
Use this table to help you with your inspection:
Part | What to Check For | What to Do If Damaged |
|---|---|---|
Bearings | Noise, rough movement | Replace |
Gears | Broken teeth, pitting | Replace or repair |
Seals | Cracks, hard spots | Replace |
Housing | Cracks, warping | Replace or machine repair |
If you find any problems, you need to plan for excavator final drive parts and repair. Order new parts if needed. Do not reuse damaged parts. This step is key for a safe and long-lasting repair.
Repairing Final Drives: Identifying Wear and Damage
You must know how to spot common problems when repairing final drives. Worn bearings can cause noise and vibration. Damaged gears may lead to loss of power or strange sounds. Bad seals often cause oil leaks. If you see metal shavings in the oil, you may have a bigger issue inside.
A good final drive diagnosis helps you find the root cause. Use your service manual and your notes from disassembly. If you are not sure about a part, compare it to a new one or ask an expert.
Note: Always replace any part that looks worn or damaged. This prevents future breakdowns and keeps your excavator running strong.
You have now finished the most important part of excavator final drive parts and repair. Careful inspection and cleaning make the next steps much easier. You are ready to move on to rebuilding your final drive.
Rebuild a Final Drive
Replacing Seals and Bearings
You need to replace seals and bearings to keep your excavator running well. Old seals can leak oil and let dirt inside. Worn bearings can make grinding or knocking noises. These problems can cause bigger damage if you do not fix them early.
You can spot the need for new seals and bearings by watching for these signs:
Oil leaks around seals and joints show seal failure.
Cloudy or gritty hydraulic oil means dirt or metal has entered the system.
Unusual noises like grinding or whining point to worn bearings.
Lower speed or weak power output signals trouble inside the final drive.
Hot surfaces or extra friction often mean the bearings have worn out.
You should always check these signs before you rebuild a final drive. If you notice any of them, replace the seals and bearings right away. This step helps prevent bigger repairs later.
Tip: Always use new seals and bearings when you rebuild a final drive. Old parts can fail quickly and cause more downtime.
Lubrication and Assembly
Clean parts need the right lubrication before you put them back together. Use the oil or grease recommended in your service manual. This keeps the gears and bearings moving smoothly.
Follow these steps for proper lubrication and assembly:
Apply a thin layer of clean oil to all moving parts.
Coat the new seals with a small amount of oil to help them seat properly.
Place the bearings in their housings and make sure they spin freely.
Fit the gears and shafts back in the correct order. Use your photos or notes from disassembly to help.
Check that all parts line up and move without sticking.
A well-lubricated final drive will last longer and run quieter. Take your time during this step. Rushing can lead to mistakes or missed parts.
Note: Never use dirty or old oil. Contaminants can ruin new seals and bearings fast.
Rebuilding an Excavator Final Drive: Step-by-Step
You can follow these steps to rebuild a final drive with confidence:
Lay out all cleaned and inspected parts on a clean surface.
Install new bearings first. Press them in gently and make sure they sit flat.
Fit new seals into place. Use a seal driver or a soft mallet to avoid damage.
Assemble the gears and shafts in the correct order. Double-check each part as you go.
Add the cover and tighten the bolts by hand at first.
Use a torque wrench to tighten bolts to the specs in your service manual.
Spin the assembly by hand to check for smooth movement.
Fill the final drive with fresh oil to the correct level.
Inspect for leaks around the seals and joints.
Here is a simple table to help you remember the order:
Step | Task | Tool Needed |
|---|---|---|
1 | Install bearings | Bearing press |
2 | Fit new seals | Seal driver/mallet |
3 | Assemble gears and shafts | Hand tools |
4 | Attach cover | Socket set |
5 | Torque bolts | Torque wrench |
6 | Fill with oil | Oil can/funnel |
🛠️ Final drive rebuild tips: Take photos at every step. Label your parts and bolts. Work slowly and check your manual often.
You have now completed the main steps for rebuilding an excavator final drive. Careful work and attention to detail will help your machine run smoothly for a long time.
Reassembly and Testing
Torque Specifications
You need to tighten every bolt to the correct torque when reassembling the final drive. This step is important because the final drive multiplies motor torque through its gears. If you use the right torque, you keep the gears in line and prevent damage. Loose bolts can cause strange noises or early wear. Tight bolts help your excavator work with strength and accuracy.
Follow these steps for proper torque application:
Check your service manual for the correct torque values.
Use a calibrated torque wrench for every bolt.
Tighten bolts in a crisscross pattern to spread the force evenly.
Double-check each bolt after the first round.
Tip: Precise torque keeps your final drive running smoothly and helps you avoid costly repairs.
Refilling Oil and Checking for Leaks
After reassembling the final drive, you must refill it with fresh oil. Use the oil type listed in your manual. Fill to the correct level. Oil keeps the gears and bearings moving without friction.
You should always check for leaks after adding oil. Clean the area around the seals and hoses. Look for drips or wet spots. Daily inspections help you find leaks early. If you see a leak, fix it right away. This prevents dirt from getting inside and causing more damage.
Leak testing is a standard step in the industry. Many shops use air pressure to check seals and housings. They test the hub section first, then the main housing, and finally the brake housing. Passing these tests means your final drive is sealed and ready for use.
Final Operation Test
You need to test your excavator before you return it to work. Start the engine and let it run at idle. Watch for leaks around the final drive. Listen for any strange sounds. Move the machine slowly and check for smooth operation.
Keep a log of your test results. This helps you track repairs and spot problems early. If you find any issues, stop and check your work. Never skip this step. A good test ensures your excavator is safe and ready for heavy-duty jobs.
🛠️ Always test your machine after reassembling the final drive. This step protects your investment and keeps your equipment running strong.
You now know the main steps to fix your excavator final drive. Take your time with each step to keep your machine safe. Always look for leaks when you finish the job. Test the final drive to make sure it works right. If you find a problem you cannot fix, ask a professional for help. Doing regular maintenance helps your final drive last longer. It also stops big repairs from costing you more money.
Remember: Careful work and regular checks keep your equipment safe.
FAQ
How often should you inspect your excavator final drive?
You should inspect your final drive every 250 hours of use. Look for leaks, strange noises, or loose bolts. Regular checks help you catch problems early.
Can you repair a final drive without special tools?
You can do basic repairs with hand tools. For some jobs, you need a torque wrench or a bearing press. Final drive experts recommend using the right tools for safety and best results.
What oil should you use in your excavator final drive?
Check your service manual for the correct oil type. Most final drives use gear oil or hydraulic oil. Using the wrong oil can cause damage.
What are signs that your final drive needs repair?
Watch for oil leaks, grinding noises, or weak power. If you see metal shavings in the oil, stop using the machine. These signs mean you need to repair the final drive soon.