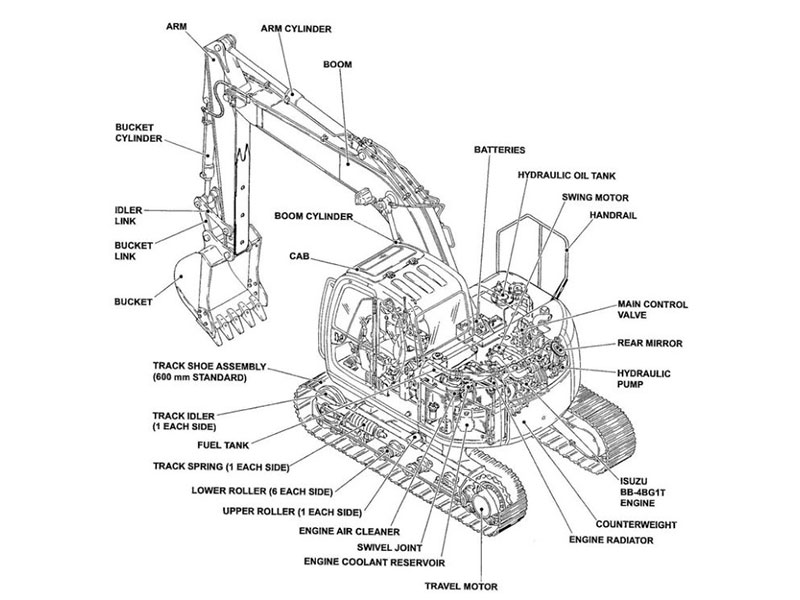

You use a track pin press to take out and put in track pins on your excavator. This tool helps you do the job safely and quickly. First, get your machine ready and wear the right safety gear. Safety is always very important. A track pin press uses hydraulic force, not hand tools. This gives you many good things:
You do not hurt your hands or arms.
You do not break your equipment.
You finish faster than with sledgehammers or other hand tools.
You keep the press steady and safe, so accidents are less likely.
If you follow the right steps, fixing your machine is easier.
Key Takeaways
Always wear safety gear like gloves and safety glasses. This keeps you safe during excavator repairs.
Use a track pin press to remove and install track pins. This makes the job safer and faster. It also lowers your chance of getting hurt.
Get your excavator ready by making it stable. Release the track tension before you start repairs.
Check all parts for wear and clean them first. Do this before you put in new pins. This helps everything work well.
Change the track tension after you put in new pins. This keeps the excavator working its best. It also stops parts from wearing out too soon.
Tools and Safety Gear
Track Pin Press Types
You can find several types of track pin presses for excavator track repair. Each type works best for different jobs and environments. Here are the most common types:
Hydraulic track pin press: You use this for heavy-duty jobs. It gives you strong, steady force to remove or install pins.
Portable track pin press: You can carry this to different sites. It works well for quick repairs or when you do not have much space.
100-ton and 150-ton track pin presses: These handle very large machines. You use them for big excavators, bulldozers, or cranes.
You use a track pin press for many tasks, such as on-site track pin maintenance, replacing worn pins, and repairing track systems after damage. You can also use it for preventative maintenance and work in different environments. YNF Machinery offers reliable options for all these needs.
Essential Tools List
Before you start, gather all the tools you need. Having the right tools helps you work faster and safer. Here is a list of essential items:
Hydraulic track pin press or pin press tool
Hammer and punch
Track pin driver
Sledgehammer (20 lbs)
Chains (5 ft and 15 ft)
Snap-on pry bar (48 in)
Chisel bar
Snap ring pliers
Ratchets (1/2 inch drive with deep 24mm socket, 10 mm ratchet)
Grease gun and grease
Lubrication
Wood block
YNF Machinery supplies high-quality track pin presses and related tools for your repair needs.
Safety Equipment
You must wear the right safety gear every time you use a track pin press. Personal protective equipment (PPE) keeps you safe from injuries. Always use:
Gloves
Safety glasses
Long pants
Hearing protection (if needed)
Using a hydraulic press for pin installation helps prevent damage and ensures a proper fit. This reduces the risk of injury during excavator track repairs.
Taking time to prepare and wear safety gear protects you and makes your work easier.
Preparation Steps
Excavator Setup
You must prepare your excavator before you use a track pin press. Start by driving the machine slowly to the repair area. Ask a spotter to help guide you if possible. Lower the bucket or blade to the ground. This step helps stabilize the excavator and keeps it from moving. Next, engage the parking brake. Turn off the engine. After you shut down the engine, move the hydraulic controls back and forth. This action releases any leftover pressure in the system.
Tip: Always place a “Do Not Operate” tag on the controls inside the cab. This tag warns others not to start the machine while you work.
Before you remove the master pin, release the tension in the track. The track holds a lot of stored energy. If you skip this step, the track could snap back and cause injury. Think of it like a stretched rubber band. You want to make sure it is safe before you begin.
Steps for safe excavator setup:
Drive the excavator to the work area with a spotter.
Lower the bucket or blade for stability.
Engage the parking brake.
Shut down the engine.
Cycle hydraulic controls to release pressure.
Place a “Do Not Operate” tag in the cab.
Release track tension before removing pins.
Work Area Safety
You need to secure your work area before starting repairs. Make sure the excavator cannot move. Check that the ground is flat and clear of debris. Read the operation and maintenance manual for your machine. This manual gives you important details about adjustments and safety.
Keep at least three points of contact when climbing on or off the machine.
Use support bars or steps for balance.
Keep tools and parts organized to avoid tripping.
Note: A clean and safe work area helps prevent accidents and makes your job easier.
Take time to double-check everything before you use the track pin press. Careful preparation keeps you and your team safe.
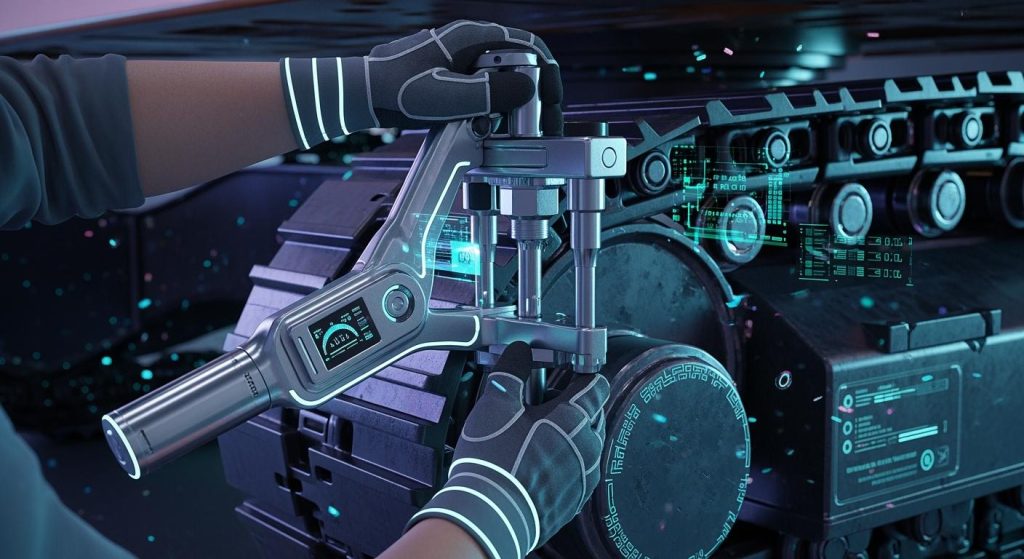
Track Pin Press: Step-by-Step

Removing Old Pins
You need to remove the old track pins before you can install new ones. Follow these steps to do it safely and correctly:
Turn the excavator cabin 90 degrees toward one of the tracks. Put the bucket on the ground to lift the undercarriage.
Find the master pin. This pin is the largest one and holds the track chain together.
Use snap ring pliers to remove the snap ring. Make sure you relieve any tension on the ring first.
Remove the track adjuster grease valve. This step releases the track tension. Always keep the excavator on the ground during this process.
Use a ratchet with a 24mm deep socket to take out the valve. Store the valve in a safe place.
Lift the excavator so the track slackens.
Line up the master pin so you can reach it easily.
Use a drift and hammer to punch out the pin. Wear safety glasses to protect your eyes.
Watch for two rings or washers inside the master pin track. Do not lose them.
Tip: Always use a blocking pin or drift to keep the track from snapping back. This step helps prevent injuries.
Cleaning and Inspection
Before you install new pins, you must clean and inspect all parts. This step ensures your excavator runs smoothly and safely.
Step | Procedure |
|---|---|
1 | Check all parts for cracks and wear. |
2 | Make sure no oil or dirt is on the parts. Clean with detergent if needed. |
You should also:
Inspect track shoes for uneven wear or broken grousers.
Check for loose or missing bolts.
Look for excessive wear on bushings and pins.
Operators should check for dirt or debris in the tracks at the start of each shift. If you see sandy or dry dirt, lift one track off the ground and rotate it to remove the debris.
Component | Signs of Wear or Damage |
|---|---|
Sprockets | Tooth tip thickness loss, hook-shaped teeth, metal scraping sounds |
Rollers | Thin rims, shaking, abnormal noise |
Idlers | Cracked rubber rings, dents, increased resistance |
Track Shoes | Uneven rim wear, loose adjustment screws, high bearing temperature |
Note: Careful inspection helps you spot problems early and avoid bigger repairs later.
Installing New Pins
Now you are ready to use the track pin press to install new pins. Follow these steps for a safe and proper installation:
Align the new pin with the holes in the track links. Make sure everything lines up straight.
Apply grease or lubricant to the new pin. Lubrication reduces friction, protects against rust, and helps the pin slide in smoothly.
Benefit | Description |
|---|---|
Reduced Friction | Minimizes wear between pins and bushings. |
Corrosion Protection | Prevents rust from moisture and chemicals. |
Heat Dissipation | Keeps temperatures safe during operation. |
Extended Service Life | Delays the need for costly replacements. |
Use the hydraulic track pin press to push the new pin into place. Activate the press slowly and watch for proper alignment.
Check that the pin is fully seated. Look for the snap ring groove to show on both sides.
Reinstall the snap rings and washers you removed earlier.
Safety Alert: Never put your hands near the press while it is working. Always double-check the alignment before you start pressing.
Adjusting Track Tension
After you install the new pins, you must adjust the track tension. This step keeps your excavator running smoothly and safely.
Remove the access cover to the track adjustment valve.
Add grease to the valve until the track reaches the correct tension. Use the manufacturer’s guide for the right measurements.
Operate the machine for a short time. This step helps equalize the grease pressure.
Measure the track sag at the midpoint. If the track is too tight, loosen the relief valve to let out grease. If it is too loose, add more grease.
Close the valve and replace the access cover.
Tip: Adjust the chain tension just enough to prevent the sprocket from jumping. For steep or muddy ground, you may need a tighter track.
You have now completed the main steps for using a track pin press to repair your excavator track. Always check your work and follow safety guidelines for the best results.
Mistakes and Safety
Common Mistakes
You can stop many problems if you know the usual mistakes. Here are some errors to avoid:
If you force pins, you might break the track or press.
If you skip cleaning, dirt and oil can cause trouble later.
If you do not inspect, you may miss cracks or worn parts.
Using bad pins makes repairs weak and can fail early.
Always follow the right steps and use good parts. This helps your excavator last longer and keeps you safe.
Safety Tips
You need to keep yourself and others safe when using a track pin press. Follow these safety tips every time you work:
Wear gloves, safety goggles, and steel-toed boots.
Use the correct tools and follow the safety rules from the manufacturer.
Make sure the machine cannot move while you fix it.
Never work alone in risky spots.
Most accidents happen when people skip safety steps or do not know the right way to use the equipment. New operators have the most risk because they do not have much training or experience.
The table below shows how many injuries different workers had with presses over twenty years:
Occupation | Assembly Presses | Brake Presses | Punch Presses | Other Presses | 20 Year Total |
|---|---|---|---|---|---|
Total | 28 | 65 | 61 | 1,257 | 1,411 |
Machine Operator, Except Precision Machines | 20 | 41 | 60 | 630 | 721 |
Laborer | 2 | 8 | 17 | 137 | 164 |
Precision Production | 3 | 7 | 7 | 110 | 127 |
Repairers/Mechanics | 1 | 2 | 2 | 68 | 73 |
Other | 2 | 7 | 5 | 312 | 326 |
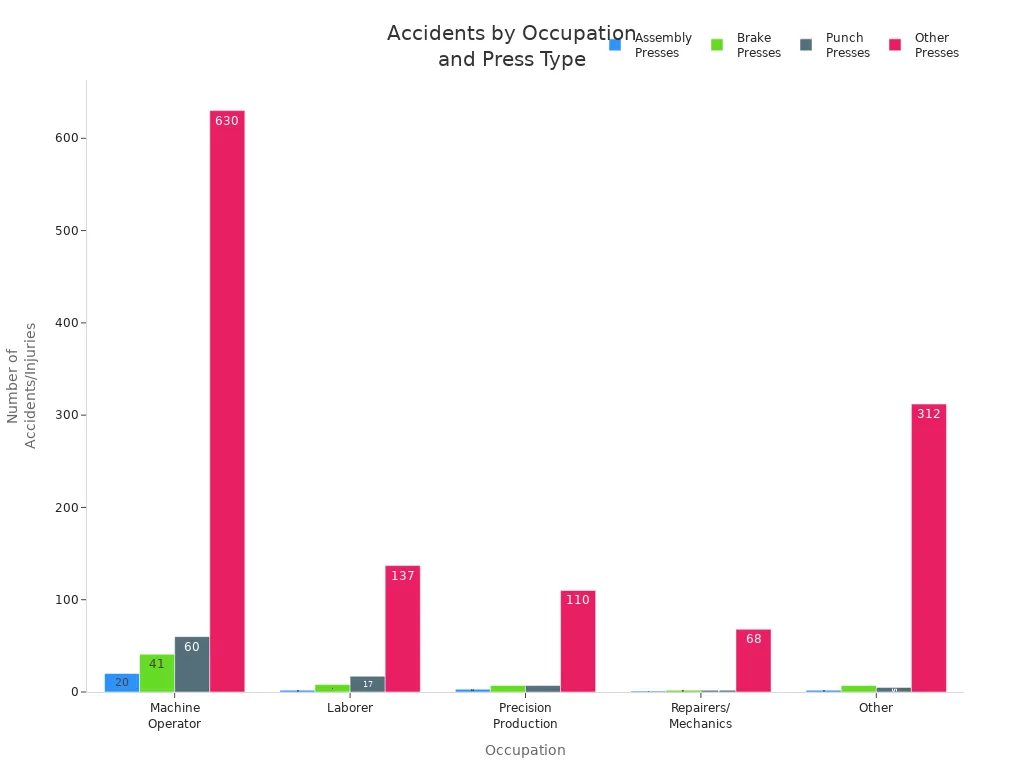
Most injuries happen when people ignore safety systems or trip by mistake. You can stop these accidents by getting good training and always following safety rules.
Stay alert, check your tools, and do not hurry. Safe habits keep you and your team protected.
If you follow each step carefully, you can fix your excavator track safely. Always use a track pin press to take out and put in pins the right way. Getting ready and using good habits helps stop damage and keeps your machine working longer. Keep these key ideas in mind:
Being exact stops damage when you put in or take out pins.
Setting the right tension keeps your track from wearing out fast or breaking.
Using the right tools keeps your machine safe.
Wearing safety gear and working carefully helps you avoid getting hurt.
Always pay attention and make safety the most important thing when you work.
FAQ
How often should you check your excavator track pins?
You should check your track pins every 250 hours of use or after working in tough conditions. Regular checks help you spot wear early and prevent bigger problems.
Can you use a track pin press on all excavator models?
Most track pin presses work with many excavator models. You should always check your machine’s manual or ask the manufacturer to make sure the press fits your equipment.
What should you do if a pin gets stuck?
If a pin gets stuck, stop and check for misalignment or debris. Apply more lubricant and try again. Never force the pin. For tough cases, ask a professional for help.
Why is track tension important after pin replacement?
Proper track tension keeps your excavator running smoothly. If the track is too tight, it can wear out fast. If it is too loose, the track might slip off. Always adjust tension after repairs.