
Yes, you can replace excavator cylinder parts yourself by following a safe process. You must always put safety first and use the right tools for the job. When you work on a boom cylinder or a swing cylinder, you need to take your time and avoid rushing. Pay attention to every step so you do not damage any excavator cylinder parts during repair. If you feel unsure, you should ask a professional to help.
Key Takeaways
Always put safety first by wearing the right gear and using the correct tools before you start any excavator cylinder repair. – Get a clean, flat place to work and talk clearly with your team to stop accidents and work well together. – Check and clean all cylinder parts carefully to find damage early and stop leaks or bigger problems later. – Change all seals and old parts with good quality pieces during rebuild to make sure the hydraulic cylinder is strong and does not leak. – Test the cylinder well after putting it back together to find leaks early and keep your excavator working safely and smoothly.
Tools and Prep for Excavator Cylinder Parts
Tools and Safety Gear
Get all your tools and safety gear before you start. The right equipment keeps you safe and helps you work better. Here are some things you will need:
Wrenches and socket sets help you loosen and tighten bolts.
Seal kits are for putting in new seals in the cylinder.
Lifting straps or slings must be strong enough for the cylinder’s weight.
Pry bars and hammers help you take out stuck parts.
Clean rags and solvent are for cleaning the parts.
Tip: Always look at your tools before you use them. Broken tools can hurt you or make the job harder.
You also need to wear the right personal protective equipment (PPE). Experts say you should use these items:
Hard hats keep your head safe from falling things.
High-visibility clothes help others see you on the site.
Safety boots with steel toes protect your feet and help you not slip.
Hearing protection keeps your ears safe from loud noise.
Gloves and eye protection stop injuries when you check or fix things.
Wearing this gear helps keep you safe and lowers your chance of getting hurt when working on heavy equipment.
Work Area Setup
Get your work area ready before you begin. Pick a flat, steady place with enough room to move around the excavator. Take away anything that could make you trip or fall. Mark any dangers so everyone can see them.
A clean and neat work area helps stop accidents and makes it easy to find your tools. Check for things like hydraulic leaks, fuel levels, and covers before you start. Test the control system and check safety equipment to help stop equipment problems.
Talking with your team is important. Use hand signals or safety boards to share news. Have safety meetings and checks often so everyone knows about dangers. Follow a checklist and the manufacturer’s maintenance plan to keep your excavator safe and working well. This way, you can avoid accidents and finish the job faster.
Removing the Excavator Hydraulic Cylinder
Disconnecting Hydraulic Lines
Start by shutting down the excavator and releasing any pressure in the hydraulic system. This step keeps you safe from sudden sprays of fluid. Use a wrench to loosen the fittings on the hydraulic cylinder. Place a drip pan under the lines to catch any oil that leaks out. Label each hydraulic line with tape or tags. This helps you remember where each line connects during reassembly. Wipe the fittings clean with a rag to keep dirt out of the system. Always cap the open lines and ports on the excavator hydraulic cylinder. This prevents dust and debris from entering the hydraulic cylinders.
Tip: Hydraulic fluid can be harmful. Wear gloves and eye protection when you disconnect the lines.
Supporting with Lifting Straps
The excavator hydraulic cylinder is heavy. Use lifting straps or slings rated for the cylinder’s weight. Wrap the straps around the cylinder body, not the rod. Attach the straps to a hoist or crane. Lift the hydraulic cylinder just enough to take the weight off the mounts. Make sure the cylinder hangs straight and does not swing. This step keeps the cylinder steady and helps you avoid injury. Never try to lift the hydraulic cylinder by hand. Always check that the straps and lifting equipment are in good condition before you begin.
Removing Pins and Mounts
Now you can remove the pins and mounts that hold the hydraulic cylinder in place. Use a hammer and punch to tap out the retaining pins. Some pins may have locking bolts or clips. Remove these first. Slide the pins out slowly while supporting the cylinder with the lifting straps. If you are removing the bucket cylinder, follow the same steps. Take care not to let the cylinder drop or twist.
Improper removal of pins and mounts can cause serious problems. Recent industry studies show that:
Misalignment and free play in mounts can damage shafts and bearings.
Loose or missing mount bolts may cause pump shaft splines to grind and twist, leading to failure.
Failing to grease pins where hydraulic cylinders mount and pivot can slow down the hydraulic cylinder, cause stalling, and create overheating.
Poor lubrication can cause mechanical binding, which may open relief valves too soon and lower system efficiency.
You must always check that pins and mounts are clean and greased before you remove or reinstall them. This step protects the excavator hydraulic cylinder and keeps the hydraulic system working well.
Inspection and Cleaning
Inspecting Cylinder and Barrel
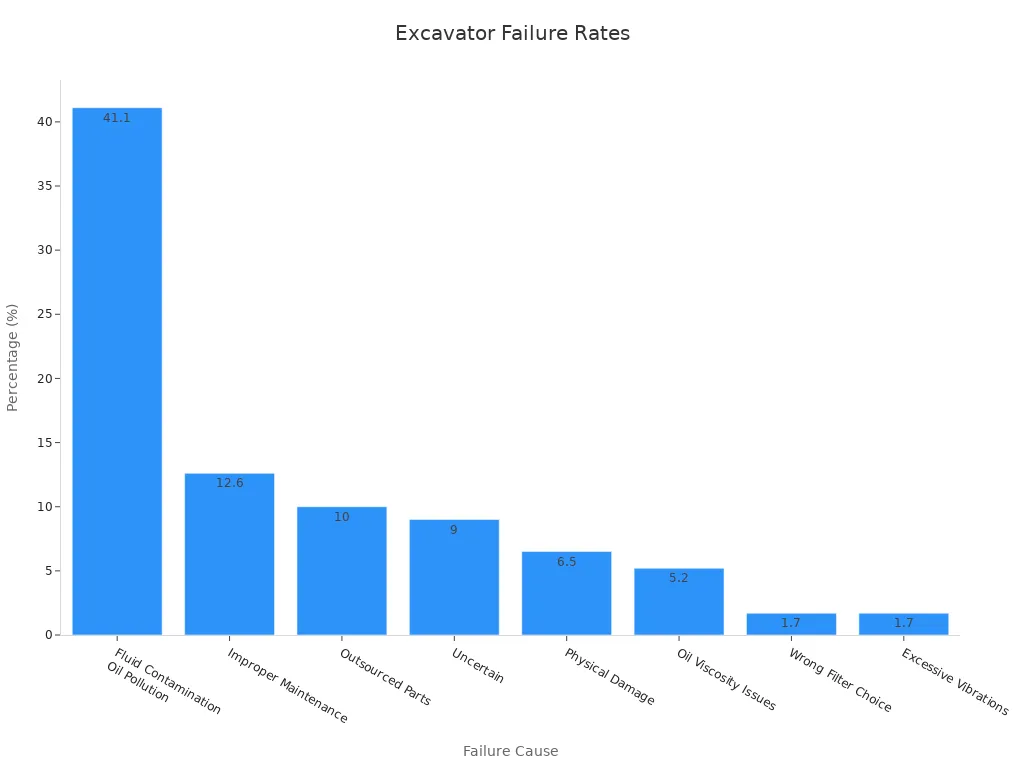
Check the hydraulic cylinder and barrel before fixing anything. Look for leaks, dents, or scratches on the surface. Use a flashlight to see inside the barrel for damage. If you spot any problems, plan to replace broken parts. Many failures happen from dirty oil or not enough care. The table below lists the main reasons for hydraulic cylinder problems:
Cause of Failure | Percentage (%) |
|---|---|
Fluid contamination/oil pollution | 41.1 |
Improper maintenance | 12.6 |
Outsourced parts | 10.0 |
Physical damage | 6.5 |
Oil viscosity issues | 5.2 |
Wrong filter choice | 1.7 |
Excessive vibrations | 1.7 |
Uncertain | 9.0 |
Always check the piston and cylinder tube for marks or pits. These can cause leaks or make the hydraulic cylinders lose power.
Cleaning for Rebuild
Cleaning is very important before you rebuild a hydraulic cylinder. Dirt and sand can break seals and cause leaks. Do these things to keep parts clean:
Wipe mud and sand off the cylinder seal dust ring and piston rod.
Clean the outside of the cylinder to stop scratches.
Change the hydraulic oil often and use good filters.
Lubricate all connections to stop rust and wear.
Some shops use spray or ultrasonic cleaning machines. These clean dirt off without hurting the cylinder. They also save time and money. Clean parts last longer and work better.
Checking for Damage
Always look for damage before putting the hydraulic cylinder back together. Check for rust, pits, or worn spots on the rod. Listen for leaks or odd sounds when you test the cylinder. If you see water or dirt in the oil, clean it right away. Checking often helps you find problems early. This keeps your hydraulic cylinders working well and stops bigger repairs later.
Tip: Finding damage early lets you fix small problems before they get worse.
Rebuild and Replace Cylinder Parts
Disassembly Steps
First, make sure the hydraulic cylinder is safe and supported. Take off the end cap or gland before anything else. Use the right tools to loosen bolts or the retaining ring. If there is a snap ring, use snap ring pliers to remove it. Pull the rod and piston out of the cylinder barrel. This is called taking apart the cylinder. Put all the excavator cylinder parts on a clean table. Keep them in order so you know how to put them back.
Check if the piston rod is straight. It should not bend more than 0.5 mm. This helps stop seal problems. Look for dents, rust, or scratches on the rod and barrel. If you see damage, plan to fix or replace the part. Take off old seals, wipers, and O-rings from the rod and piston. Use a seal pick or plastic tool so you do not scratch the metal. Clean every part with a lint-free rag and solvent before you move on.
Tip: Keep your work area clean. Dirt and dust can cause trouble when you rebuild a hydraulic cylinder.
Replacing Seals and Components
Changing the seals is very important for fixing the cylinder. Use a seal kit that fits your model. Good seals made from polyurethane or nitrile rubber last longer and stop leaks. Eaton’s leak-resistant seal design stops leaks in almost all cases and is used in many hydraulic systems. When you rebuild, always change all seals and packing to keep the hydraulic cylinder strong.
Here are steps for changing seals and other parts:
Take out all old seals and clean the grooves.
Check if the piston rod has chrome plating. If it is damaged, replace the rod or fix the surface and change the seals.
Put in new seals, O-rings, and wipers in the right order. Use a little hydraulic oil to help them slide in.
Look at the rod wipers and rubber boots. These keep dirt away from seals and help your excavator cylinder parts last longer.
Seal Saver technology keeps dirt out. Cleaning up dirt costs much more than stopping it, so always keep parts clean.
Using a Repacking Kit
A repacking kit makes rebuilding a hydraulic cylinder easier. The kit has all the seals, O-rings, and wipers you need. Using a kit saves time and makes sure you do not forget any parts. When you need to repack your cylinder, follow the kit’s instructions. Each seal goes in a special place and direction. If you put a seal in backward, it might leak or break.
Many companies now use strong seals and hard-chrome plated rods. In 2023, about 15 million piston rods were made, and most had chrome plating to last longer. Black nitride rods last three times longer than regular chrome rods. These upgrades help your hydraulic cylinder work better and last longer.
Always check for parts that do not line up or are loose. These problems can hurt seals and make them fail early. Careful assembly keeps your excavator cylinder parts working well.
Bucket Cylinder Tips
The bucket cylinder works hard and faces tough jobs. You must be careful when you fix or change bucket cylinder parts. Always wear safety glasses, gloves, and protective clothes. Lock and tag the hydraulic system before you start. Let out all pressure to avoid fluid dangers.
Here are some good tips for working with the bucket cylinder:
Maintenance Strategy | Recommended Practice |
|---|---|
Regular Inspections | Check for leaks, wear, and damage before and after each use. |
Proper Lubrication | Use the right hydraulic oil and keep all parts oiled. |
Seal Integrity | Change seals as soon as you see wear or damage. |
Contamination Control | Keep hydraulic oil clean to stop inside damage. |
Preventative Repairs | Fix small problems fast to avoid bigger ones. |
Rod and Surface Care | Keep rods clean and free of dirt to protect seals. |
Always use the right lifting tools like cranes or hoists for heavy bucket cylinder parts. Make sure your work area is clean so dirt does not get inside. Double-check all connections and fittings for leaks before you start the system again. Follow the maker’s instructions for storage, lifting, and moving. Lower hydraulic loads onto locks and turn off the pump before you start repairs.
Learning how to rebuild excavator hydraulic cylinders helps you avoid big repairs and keeps your machine working well. If you follow these steps, you can fix your bucket cylinder safely and quickly.
Reassembly and Testing Hydraulic Cylinder
Reassembly Steps
You must be careful when putting the cylinder back together. Make sure all parts are clean and dry before you start. Use the right tools and check if they work well. Put in new seals and o-rings one by one. Each seal should fit the piston just right. This stops leaks and damage. Only use thread locking glue on the piston rod bolt. Do not put glue on gland threads. Put the piston rod and gland back into the cylinder the way you took them out. Doing this step-by-step helps the cylinder work well and keeps it safe.
Here are the best steps for putting the cylinder together:
Look at all parts after taking them apart to spot damage.
Get all special tools and make sure they work.
Match seals to the piston’s size.
Change seals and o-rings one at a time.
Use thread locking glue on the piston rod bolt.
Do not use glue on gland threads.
Put the piston rod and gland back in the opposite order.
Test the cylinder after putting it together to check for leaks.
Doing these steps helps you stop future problems and saves money and time.
Reinstalling Cylinder
Use a hoist or crane to lift the hydraulic cylinder. Line it up with the mounts on the machine. Slide the pins in and lock them with clips or bolts. Hook up the hydraulic lines to the right ports. Take off any caps or plugs from the lines. Tighten all the fittings and check for dirt. Make sure the cylinder moves easily before you finish. This step is important for fixing the cylinder and keeping the machine safe.
Testing for Leaks
After fixing the cylinder, you need to check for leaks. Start the machine and move the cylinder all the way out and in. Watch for oil leaking from seals or fittings. Wipe around the connections with a clean rag. If you see oil, stop and fix it. Leak testing works well and helps you find small leaks early. The table below shows how good leak testing is:
Statistical Measure | Description | Result / Value |
|---|---|---|
Number of tests for threshold setting | Tests under normal and leakage conditions to establish detection thresholds | 18 tests |
Small leakage detection rate | Percentage of small leakage tests correctly identified using RMS threshold | 80% |
Detection accuracy for simultaneous leakages | Tests detecting both internal and external leakages simultaneously | 90% (9 tests) |
Minimum detectable leakage rate (internal) | Lowest internal leakage rate detected using Hilbert Huang transform on pressure signals | 0.124 L/min (periodic input) |
Minimum detectable leakage rate (pseudo-random input) | Lowest internal leakage rate detected with pseudo-random input signal | 0.230 L/min |
AE RMS feature linearity | Consistent linear increase of AE RMS feature with leakage severity | Confirmed with bandpass filter 60-80 kHz |
Variation in scaling factors across sensors | Variation in AE RMS scaling factors between sensor locations | ~1.4% |
Variation in scaling factors across rod speeds | Variation in AE RMS scaling factors between different rod speeds | ~1.4% |
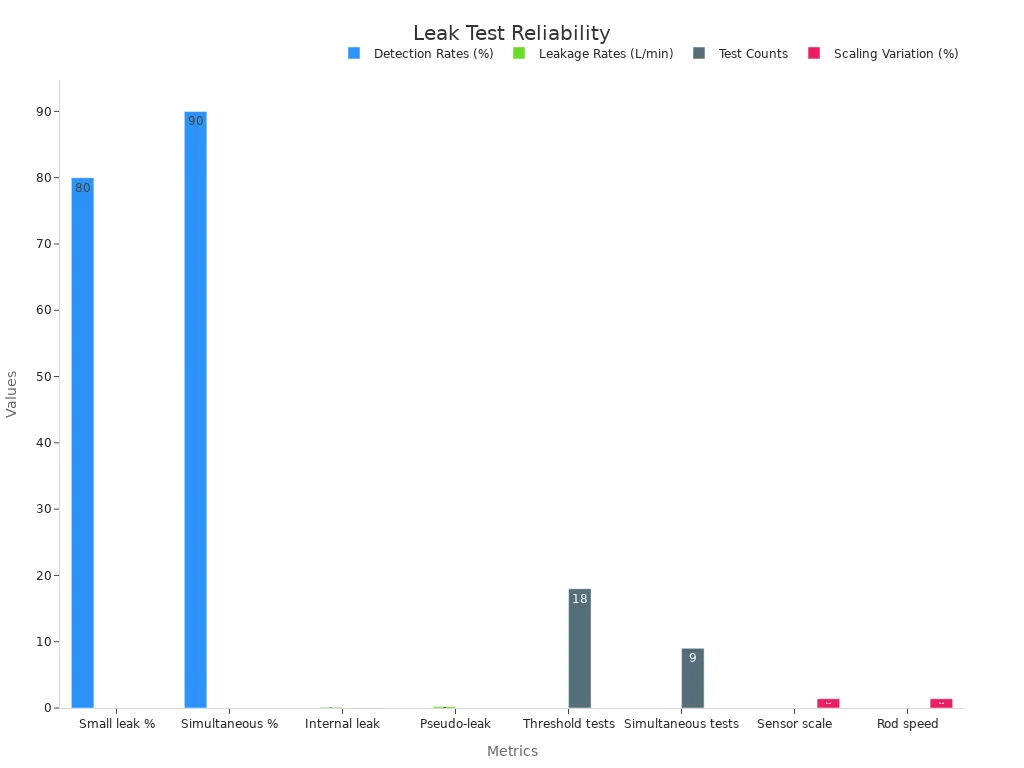
Leak testing helps you find problems before they get worse.
Troubleshooting
If you see problems after fixing the cylinder, check for these things:
Leaks often come from old seals or broken rods. You might see oil coming out and lose pressure.
Boom drift can happen if seals inside wear out or if control valves break. The boom may move when you do not want it to.
Oil leaks can come from old seals, cracked hoses, or worn gaskets. These leaks make the machine work less well and can cause more trouble.
You can stop most problems by checking often and fixing things fast. Always look at seals, rods, hoses, and gaskets. Tighten all connections and use leak check fluids if you need to. These steps help you fix the cylinder and keep your machine working well.
Always check your work to make sure it is safe. Look for leaks before you use your excavator. Cleaning and taking care of your machine helps it last longer. It also helps your excavator work better. The table below shows what you get from good care:
Benefit | Result |
|---|---|
Preventable Failures | 90% of engine failures can be stopped with regular checks |
Equipment Life | Longer life with less wear and tear |
Fuel Efficiency | Lower fuel use and costs |
Repair Costs | Fewer big repairs and lower expenses |
If you are not sure or see a problem, get help from a pro. Doing these things keeps your repairs safe and helps you work faster.
FAQ
How often should you check your excavator hydraulic cylinders?
You should inspect your hydraulic cylinders before each use. Look for leaks, dents, or loose fittings. Regular checks help you find problems early and keep your machine running well.
Can you reuse old seals when rebuilding a cylinder?
You should never reuse old seals. Old seals can leak or break. Always use new seals from a quality kit. This keeps your hydraulic cylinder strong and leak-free.
What should you do if you see oil leaking after reassembly?
Stop the machine right away. Check all fittings and seals for tightness. Wipe the area clean and watch for leaks. If you still see oil, replace the faulty part or ask a professional for help.
Do you need special tools to replace excavator cylinder parts?
Yes, you need some special tools. Use a seal pick, snap ring pliers, and lifting straps. These tools help you remove and install parts safely. Using the right tools also protects you from injury.