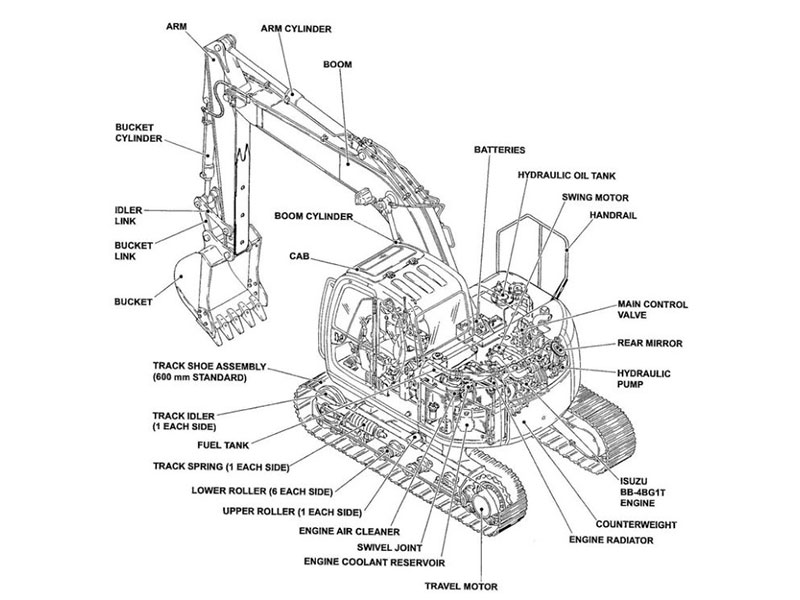
Replacing an excavator idler assembly is crucial for maintaining your machine’s performance and safety. A damaged idler can lead to excessive wear on tracks and rollers, causing costly repairs or downtime. Regular replacement ensures smooth operation and prevents further damage to your excavator. This step-by-step guide empowers you to handle the process with confidence. For high-quality parts, trust YNF Machinery, a reliable supplier with over 35 years of experience in providing durable excavator components.
Key Takeaways
Gather essential tools and safety gear before starting the replacement process to ensure efficiency and safety.
Always lift the excavator securely using jacks and stands to prevent accidents during the replacement.
Loosen the track tension properly to facilitate safe removal of the old idler assembly without damaging components.
Inspect the old idler assembly for wear and clean the area before installing the new one to ensure a proper fit.
Align and torque the new idler assembly according to manufacturer specifications to prevent future operational issues.
Adjust the track tension correctly after installation to enhance performance and extend the lifespan of your excavator.
Conduct thorough final checks and a test run to confirm that the installation is secure and the excavator operates smoothly.
Step 1: Gather Tools and Prepare the Workspace
Replacing an excavator idler assembly requires careful preparation. Gathering the right tools, wearing proper safety gear, and setting up a suitable workspace are essential steps to ensure a smooth and safe process.
Essential Tools and Equipment for Replacing an Excavator Idler Assembly
You need specific tools to complete the replacement efficiently. These include:
A grease gun for lubricating components.
A pry bar to assist in loosening and adjusting parts.
A socket set for unbolting and securing the idler assembly.
Machinery stands to support the excavator during the process.
Having these tools ready before starting saves time and prevents interruptions.
Safety Gear and Precautions
Safety should always come first when working with heavy machinery. Equip yourself with:
Durable gloves to protect your hands from sharp edges and debris.
Eye protection to shield your eyes from dust and flying particles.
Additionally, ensure you follow these precautions:
Avoid loose clothing that could get caught in machinery.
Double-check that all tools and equipment are in good condition.
Taking these measures minimizes risks and keeps you safe throughout the task.
Preparing the Workspace for Track Replacement
A well-prepared workspace is crucial for a successful track replacement. Follow these steps:
Park the excavator on a flat, firm surface. This ensures stability during the process.
Clear the area of debris, dirt, and dust. A clean workspace reduces the chances of accidents.
Barricade or tape off the area to prevent unauthorized access. This keeps others safe and avoids distractions.
By organizing your workspace, you create a safe and efficient environment for replacing the idler assembly.
Step 2: Safely Lift the Excavator
Lifting the excavator safely is a critical step in replacing the idler assembly. Proper positioning and securing techniques ensure stability and prevent accidents during the process.
Positioning the Excavator for Idler Assembly Replacement
Start by parking the excavator on a flat, solid surface. This provides a stable foundation and reduces the risk of tipping. Ensure the area is free from loose debris or uneven ground that could compromise safety. Engage the parking brake to keep the machine stationary.
Next, position the excavator’s boom and arm to enhance balance. Lower the bucket to the ground and extend the arm slightly forward. This setup distributes the weight evenly and adds stability while lifting the machine.
“Once the idler has been pulled inside the undercarriage of the mini-excavator, the track can easily be removed.” – Expert in Excavator Maintenance
Following this advice, ensure the tracks are accessible by slightly tilting the machine if necessary. This adjustment simplifies the removal and replacement process.
Using Jacks and Stands to Secure the Excavator
Use heavy-duty jacks to lift the excavator. Place the jacks under the designated lifting points, typically located near the undercarriage. Refer to your machine’s manual to identify these points accurately. Gradually raise the excavator, ensuring both sides are lifted evenly to maintain balance.
Once lifted, secure the machine with sturdy machinery stands. Position the stands under the frame to provide additional support. Double-check that the stands are stable and can bear the excavator’s weight without shifting.
Avoid relying solely on jacks for support. Jacks are designed for lifting, not long-term stability. Always use stands to prevent accidents or equipment damage.
By following these steps, you create a safe environment for replacing the idler assembly. Proper lifting and securing techniques protect both you and your equipment, ensuring a smooth and efficient process.
Step 3: Loosen the Excavator Tracks
Loosening the excavator tracks is a vital step in the idler assembly replacement process. Properly releasing the track tension ensures a smooth removal and prevents unnecessary damage to the machine. Follow these steps to handle this task efficiently.
Locating the Track Tensioner Mechanism
Begin by identifying the track tensioner mechanism on your excavator. This component is typically located near the undercarriage, within the track frame. Consult your excavator’s manual to pinpoint its exact position. The tensioner mechanism usually consists of a grease fitting and a cylinder that adjusts the track’s tightness.
Inspect the area around the tensioner for dirt or debris. Cleaning this section before proceeding helps you access the mechanism more easily. Use a clean cloth or brush to remove any buildup. A clear view of the tensioner ensures you can work without obstructions.
“Regularly checking tracks for wear signs and maintaining proper tension prevents machine damage and extends the lifespan of components.” – TVH Learning Hub
This advice highlights the importance of understanding your machine’s tensioner system. Familiarity with its location and function simplifies the loosening process.
Releasing Track Tension Safely
Once you locate the tensioner, proceed to release the track tension. Use a wrench or socket to loosen the grease fitting on the tensioner cylinder. This action allows grease to escape, reducing the pressure that keeps the tracks tight. Place a container beneath the fitting to catch the grease and prevent spills.
Monitor the track as you release the tension. The track should gradually loosen and sag slightly. Avoid forcing the process, as sudden movements can damage the tensioner or other components. If the track does not loosen as expected, double-check the grease fitting and ensure it is fully open.
“Tracks should be tightened or loosened as needed based on measurements to ensure peak performance.” – Takeuchi US
This insight underscores the importance of careful adjustments. Properly loosening the tracks prepares them for removal during the track replacement process.
After releasing the tension, inspect the tracks for any visible damage or wear. Addressing these issues now can save time and effort later. With the tracks loosened, you are ready to proceed to the next step in replacing the idler assembly.
Step 4: Remove the Old Excavator Idler Assembly

Removing the old excavator idler assembly is a crucial step in the replacement process. This ensures that the new assembly can be installed correctly and functions efficiently. Follow these steps to detach the tracks and unbolt the idler assembly.
Detaching the Excavator Tracks
To begin, you need to remove the tracks to access the idler assembly. Start by ensuring the track tension has been fully released, as described in the previous step. Loosened tracks make the removal process smoother and safer.
Lift the Tracks Off the Undercarriage: Use a pry bar or similar tool to carefully lift the tracks off the sprockets and idler wheels. Work slowly to avoid damaging the tracks or surrounding components.
Slide the Tracks Away: Once loosened, slide the tracks away from the undercarriage. This creates enough space to access the idler assembly. If you plan to replace rubber tracks, inspect them for wear or damage before proceeding.
“Tracks that wobble or show uneven wear often indicate issues with the idler assembly or bearings.” – Experienced Operator on TractorByNet Forum
This insight highlights the importance of inspecting the tracks during this step. Addressing any issues now can save time and effort later.
Secure the Tracks: After removing the tracks, place them in a safe location. Ensure they are clean and free from debris if you intend to reinstall them. For those planning to install the new track, this is the perfect time to prepare it for installation.
Unbolting and Inspecting the Idler Assembly
With the tracks removed, you can now focus on unbolting the old excavator idler assembly. This step requires precision and attention to detail.
Locate the Bolts: Identify the bolts securing the idler assembly to the undercarriage. These bolts are typically located near the rear track idler wheels. Refer to your excavator’s manual for exact bolt locations.
Remove the Bolts: Use a socket set to carefully remove the bolts. Work systematically, loosening each bolt evenly to prevent unnecessary strain on the assembly. Keep the bolts in a safe place if they are reusable.
Inspect the Idler Assembly: Once unbolted, remove the idler assembly from the excavator. Examine it for signs of wear, such as damaged bearings or cracks. A failed bearing, for instance, can cause wobbling and heat buildup, potentially affecting other components like the drive motor.
“Replacing worn idlers during track maintenance prevents further damage and ensures smooth operation.” – Maintenance Expert
This advice emphasizes the importance of thorough inspection during the replacement process. Identifying and addressing issues now ensures the longevity of your excavator.
Clean the Area: Before proceeding with the installation of the new sprocket or idler assembly, clean the mounting area. Remove dirt, grease, and debris to ensure a secure and proper fit during installation.
By completing these steps, you prepare your excavator for the next phase of the replacement process. Removing the old idler assembly sets the stage for a smooth and efficient installation of the new components.
Step 5: Install the New Excavator Idler Assembly
Installing the new idler assembly is a critical step in ensuring your excavator operates smoothly and efficiently. Proper alignment and secure fastening are essential to avoid future issues and maintain optimal performance.
Aligning and Positioning the New Idler Assembly
To begin, carefully position the new idler assembly in the mounting area. Ensure the surface is clean and free of debris to allow for a proper fit. A clean surface prevents misalignment and ensures the assembly sits securely.
Inspect the New Idler Assembly: Before installation, check the new idler assembly for any visible defects or damage. Look for cracks, uneven surfaces, or loose components. This step ensures you are installing a reliable part.
Align the Assembly: Place the idler assembly into the designated slot on the undercarriage. Use the alignment marks or guides provided by the manufacturer to position it correctly. Refer to your excavator’s manual for specific alignment instructions.
Check the Fit: Once aligned, verify that the assembly fits snugly within the track frame. Misalignment can lead to uneven wear on the tracks and rollers, reducing the lifespan of your components.
“Proper alignment during installation prevents unnecessary wear and ensures smooth operation.” – Maintenance Guide for Heavy Machinery
Taking the time to align the idler assembly correctly ensures that the replacement process is successful and your excavator performs at its best.
Securing the Idler Assembly with Proper Torque
After aligning the idler assembly, secure it using the appropriate tools and torque specifications. Proper fastening prevents the assembly from loosening during operation, which could lead to damage or safety hazards.
Insert the Bolts: Begin by inserting the bolts into the mounting holes. Tighten them by hand to hold the assembly in place. This step ensures the assembly remains stable while you apply torque.
Use a Torque Wrench: Set your torque wrench to the specifications provided in your excavator’s manual. Tighten each bolt evenly, following a crisscross pattern. This method distributes pressure evenly and prevents warping.
Double-Check the Torque: After securing all bolts, recheck the torque on each one. Consistent torque ensures the assembly stays firmly in place during operation.
“Using the correct torque specifications is crucial for maintaining the integrity of the idler assembly and surrounding components.” – Expert Advice from Equipment Manuals
Inspect the Installation: Once the assembly is secured, inspect the area for any loose bolts or misaligned parts. A thorough inspection ensures the replacement process is complete and the assembly is ready for use.
By following these steps, you ensure the new idler assembly is installed correctly and securely. Proper alignment and torque application are vital for the longevity and performance of your excavator.
Step 6: Adjust the Track Tension
Properly adjusting the track tension is essential for maintaining your excavator’s performance and ensuring the longevity of its components. Tracks that are too tight or too loose can lead to excessive wear, reduced efficiency, and potential safety hazards. Follow these steps to reinstall the excavator tracks and achieve the correct tension for optimal operation.
Reinstalling the Excavator Tracks
Reinstalling the excavator tracks is a straightforward process when done methodically. Ensure you have the necessary tools and a clean workspace before starting.
Position the Tracks: Begin by aligning the tracks with the undercarriage. Slide the tracks into place, ensuring they sit properly on the sprockets and idler wheels. Take your time to avoid misalignment, which can cause uneven wear during operation.
Fit the Tracks Over the Components: Use a pry bar or similar tool to guide the tracks over the sprockets and idler wheels. Work gradually, ensuring the tracks fit snugly without forcing them into position. Misaligned tracks can lead to operational issues and premature wear.
Secure the Tracks: Once the tracks are in place, double-check their alignment. Ensure they are evenly positioned along the undercarriage. This step is crucial for smooth operation and prevents unnecessary strain on the idler assembly.
“Proper track alignment during reinstallation ensures smooth operation and reduces wear on components.” – Heavy Equipment Maintenance Guide
By carefully reinstalling the tracks, you set the foundation for a successful track replacement process.
Tightening the Track Tension for Optimal Performance
After reinstalling the tracks, you need to adjust the track tension to the manufacturer’s recommended specifications. Correct tension ensures efficient operation and prevents excessive wear on the excavator tracks and other components.
Locate the Track Tension Adjusters: Find the track tension adjusters on your excavator. These are typically located near the undercarriage and consist of a grease fitting and a cylinder. Refer to your machine’s manual for precise details.
Add Grease to Tighten the Tracks: Use a grease gun to add grease to the tensioner cylinder. This action pushes the idler wheel forward, tightening the tracks. Monitor the track tension as you work, ensuring it tightens gradually and evenly.
Check the Tension: Measure the sag in the tracks to confirm they meet the manufacturer’s specifications. Use a ruler or tape measure to check the distance between the track and the undercarriage at the midpoint. Proper tension prevents the tracks from slipping or causing unnecessary strain on the system.
Test the Tracks: Once adjusted, test the tracks by moving the excavator forward and backward a few feet. Observe the tracks for any signs of misalignment or uneven tension. Make further adjustments if necessary to achieve optimal performance.
“Adjusting track tension to the correct specifications enhances machine performance and extends the lifespan of components.” – Equipment Maintenance Expert
By tightening the track tension correctly, you ensure your excavator operates efficiently and safely. Regularly checking and maintaining the track tension also helps prevent costly repairs and downtime.
Step 7: Perform Final Checks and Test Run
Completing the replacement of your excavator idler assembly requires thorough final checks and a test run. These steps ensure the installation is secure and the excavator operates smoothly. Skipping this phase can lead to operational issues or even damage to your machine.
Inspecting the Installation of the Excavator Idler Assembly
Before starting the excavator, carefully inspect the newly installed idler assembly. A detailed inspection helps you identify any loose components or misalignments that could cause problems during operation.
Check Bolt Tightness: Ensure all bolts securing the idler assembly are tightened to the recommended torque. Loose bolts can lead to instability and premature wear.
Examine Alignment: Verify that the idler assembly is properly aligned within the track frame. Misalignment can cause uneven track wear and affect the performance of the excavator.
Inspect the Tracks: Look for proper track tension and alignment. Tracks that sag or appear uneven may need further adjustment.
Look for Debris: Remove any dirt, grease, or debris around the idler assembly and tracks. A clean setup ensures smooth operation and reduces the risk of damage.
“I once ignored a wobbling track and thought it was just rocks causing the noise. Later, I found the idler bearing had failed, causing heat buildup and affecting the drive motor.” – Experienced Operator
This story highlights the importance of inspecting the idler assembly thoroughly. Identifying issues early prevents costly repairs and downtime.
Testing the Excavator for Smooth Operation
After completing the inspection, perform a test run to confirm the excavator operates as expected. Testing ensures the idler assembly and tracks function correctly under real-world conditions.
Start the Excavator: Power up the machine and let it idle for a few minutes. Listen for unusual noises, such as grinding or squeaking, which could indicate improper installation.
Move the Excavator: Drive the excavator forward and backward slowly. Observe the tracks for smooth movement and proper alignment. Tracks that wobble or slip may need further adjustments.
Test Under Load: Use the excavator to perform basic tasks, such as lifting or digging. Monitor the idler assembly and tracks for stability and performance.
Recheck Components: After the test run, inspect the idler assembly and tracks again. Look for any signs of loosening or misalignment.
“Testing the machine after replacing parts ensures everything works as intended and avoids surprises during operation.” – Heavy Equipment Maintenance Guide
By conducting a thorough test run, you confirm the success of the replacement process. Regular maintenance and careful testing extend the lifespan of your excavator and its components.
Replacing an excavator idler assembly may seem challenging, but following this step-by-step guide ensures a smooth and efficient replacement process. Regular maintenance and proper installation play a vital role in extending the life of your excavator tracks and components. By taking these steps, you reduce downtime and improve machine performance. For reliable and durable parts, trust YNF Machinery, a leader in high-quality excavator components. If you face difficulties during the process, consult a professional to ensure safety and accuracy.