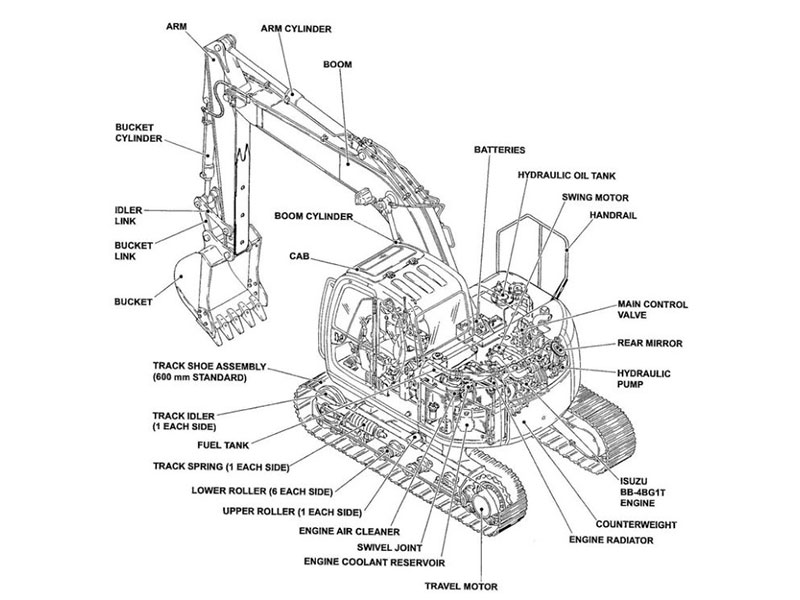
Keeping your excavator in top shape can feel like a challenge, especially when dealing with its tracks. That’s where an excavator track parts diagram becomes your best friend. It helps you quickly pinpoint components, spot issues, and plan repairs with confidence. By using these diagrams, you avoid guesswork and ensure every maintenance task is done right. Whether you’re replacing a worn roller or inspecting a sprocket, this tool saves you time and effort while boosting accuracy.
Key Takeaways
Excavator track part diagrams make maintenance easier. They show where each part goes. This helps you find problems fast and plan fixes.
Using diagrams makes maintenance more accurate. You can find the exact part that needs fixing. This reduces guessing and avoids extra repairs.
Diagrams save time during repairs. They help you find problems quickly, so you can fix them faster.
Diagrams improve communication with technicians. They give a clear picture, so everyone knows which parts need work.
Update your diagrams often to keep them correct. This avoids mistakes and makes maintenance smoother.
Understanding Excavator Track Parts Diagrams
What Are Excavator Track Parts Diagrams?
Excavator track parts diagrams are detailed illustrations that map out the components of an excavator’s track system. These diagrams act like a blueprint, showing you exactly where each part fits and how they work together. Whether you’re a seasoned operator or new to maintenance, these diagrams make it easier to understand your machine’s tracks. They highlight everything from the track pads to the bolts, giving you a clear picture of what needs attention during repairs or inspections.
Think of it as a guide that simplifies complex systems. Instead of guessing which part is causing trouble, you can quickly identify it using the diagram. This saves time and ensures you’re addressing the right issue. Plus, it’s a handy tool for communicating with technicians or suppliers when ordering replacement parts.
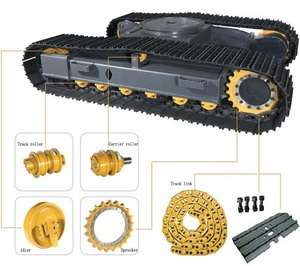
Key Components in Excavator Track Parts Diagrams
Excavator track parts diagrams include several critical components. Here’s a breakdown of the most common ones:
Track pads: These are the surface elements that contact the ground. They play a big role in traction and stability.
Chains and shoes: These connect the track pads and allow smooth movement.
Bolts: These hold the track components together. Proper maintenance is crucial to avoid assembly issues.
Rock guards: These protect the undercarriage from debris, reducing damage.
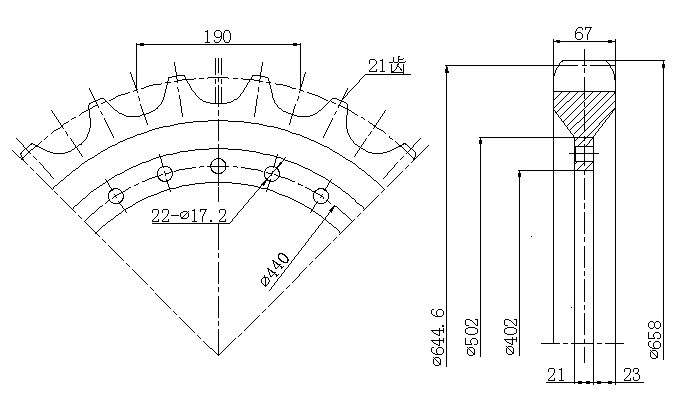
Sprockets: These engage with the track links to propel the excavator forward or backward.
Track rollers and idlers: These maintain alignment and control tension, ensuring the tracks stay in place.
Understanding these parts helps you keep your excavator running smoothly. For example, knowing how track pads affect traction can improve stability on uneven terrain. Similarly, maintaining bolts and rock guards prevents costly repairs down the line.
Track Rollers
Track rollers support the weight of the excavator and help the tracks move smoothly. They also keep the tracks aligned, which is essential for proper operation. Worn-out rollers can cause misalignment, leading to uneven wear on other components.
Sprockets
Sprockets are the driving force behind your excavator’s movement. They engage with the track links, allowing the tracks to rotate. Damaged sprockets can disrupt the excavator’s performance, so regular checks are vital.
Idlers
Idlers control the tension in the tracks and guide them as they move. They prevent the tracks from slipping off and ensure smooth operation. If an idler is damaged, it can lead to slack in the tracks, affecting stability and performance.
How to Read and Interpret Excavator Track Parts Diagrams
Reading an excavator track parts diagram might seem tricky at first, but it’s simpler than you think. Start by locating the legend or key, which explains the symbols and labels used in the diagram. Then, identify the specific part you’re working on, such as a sprocket or track roller. Follow the lines and connections to see how it interacts with other components.
Pay attention to the numbering or labeling system. Many diagrams use part numbers that correspond to a parts list. This makes it easy to cross-reference and order replacements. If you’re unsure about a specific detail, consult your equipment manual or reach out to a trusted supplier like YNF Machinery for guidance.
By mastering these diagrams, you’ll not only save time but also improve the accuracy of your maintenance tasks. It’s a skill that pays off in the long run, keeping your excavator in peak condition.
Benefits of Using Excavator Track Parts Diagrams
Improved Accuracy in Maintenance
Using an excavator track parts diagram makes maintenance tasks much more precise. You can easily identify the exact part that needs attention, whether it’s a sprocket, roller, or idler. This eliminates the guesswork and ensures you’re focusing on the right component. For example, if your excavator’s tracks are misaligned, the diagram helps you pinpoint whether the issue lies with the rollers or the tensioning system.
Accurate maintenance not only extends the life of your excavator but also prevents unnecessary repairs. You won’t waste time or money replacing parts that are still in good condition. Plus, when you communicate with technicians or suppliers, the diagram ensures everyone is on the same page. This clarity reduces misunderstandings and speeds up the entire process.
Time Savings During Repairs
Time is money, especially when your excavator is essential for your projects. An excavator track parts diagram saves you valuable time during repairs. Instead of dismantling multiple components to find the problem, you can use the diagram to locate the issue right away.
For instance, if your tracks aren’t moving smoothly, the diagram can guide you to inspect the rollers or sprockets first. This targeted approach means you spend less time troubleshooting and more time fixing the problem. With the diagram as your guide, you can also plan repairs more efficiently, ensuring you have the right tools and parts on hand before you start.
Reduced Errors and Misdiagnoses
Mistakes during maintenance can lead to costly downtime or even damage to your excavator. By relying on an excavator track parts diagram, you minimize the risk of errors. The diagram provides a clear visual reference, so you know exactly how each part fits and functions.
For example, if you’re replacing a worn sprocket, the diagram ensures you install the new one correctly. It also helps you double-check your work, reducing the chance of overlooking a critical detail. This level of accuracy keeps your excavator running smoothly and prevents small issues from turning into major problems.
Pro Tip: Always keep your excavator track parts diagram handy during maintenance. It’s a simple step that can save you a lot of headaches down the road.
Enhanced Communication with Technicians
When working on an excavator, clear communication with technicians is essential. Misunderstandings can lead to delays, errors, or even costly repairs. That’s where excavator track parts diagrams come in handy. These diagrams act as a universal language, bridging the gap between operators and technicians.
Diagrams simplify complex information, making it easier for everyone to stay on the same page. For instance, instead of describing a part as “the round thing near the track,” you can point to the exact component on the diagram. This clarity eliminates confusion and speeds up the troubleshooting process.
Here’s how diagrams enhance communication:
They simplify complex information, breaking it down into visual elements.
They bridge the gap between theoretical concepts and practical applications.
A well-drafted schematic helps technicians understand how their actions affect the entire system.
Imagine you’re discussing a sprocket issue with a technician. Instead of lengthy explanations, you can use the diagram to show the sprocket’s location and its connection to other parts. This visual aid ensures the technician knows exactly what to inspect or replace. It also helps when ordering parts. By referencing the diagram, you can provide the correct part number, avoiding delays caused by ordering the wrong item.
Using diagrams also fosters teamwork. Everyone involved in the maintenance process can refer to the same visual guide, ensuring consistency. Whether you’re diagnosing a problem or planning repairs, diagrams make communication smoother and more efficient.
Tip: Keep a copy of your excavator track parts diagram in your toolbox or on your device. It’s a small step that can make a big difference during maintenance.
Step-by-Step Guide to Using Excavator Track Parts Diagrams for Maintenance

Preparation Before Maintenance
Gather Necessary Tools and Materials
Before diving into maintenance, make sure you have everything you need. Gather tools like wrenches, screwdrivers, and a torque wrench. Keep replacement parts handy, especially if you already know what needs fixing. Having the right tools and materials saves time and prevents interruptions. You’ll also want to keep your excavator track parts diagram within reach. Whether it’s a printed copy or a digital version, this diagram will guide you through the process.
Locate and Understand the Diagram
Start by finding the correct diagram for your excavator model. Manufacturers often include these in the equipment manual. Once you have it, take a moment to study it. Look for the legend or key, which explains the symbols and labels. Familiarize yourself with the layout so you can quickly locate parts like rollers, sprockets, or idlers. This step ensures you’re ready to tackle the maintenance efficiently.
Inspection and Diagnosis
Identifying Worn or Damaged Parts
Inspect the tracks thoroughly. Look for signs of wear, such as cracks, loose bolts, or uneven surfaces. Pay close attention to the rollers, sprockets, and idlers, as these parts often experience the most stress. If you notice slack or misalignment, it’s time to dig deeper. Don’t forget to check the tracks for debris or damage that might affect performance.
Cross-Referencing with the Diagram
Once you spot an issue, use the excavator track parts diagram to pinpoint the exact part. Cross-referencing helps you confirm the problem and understand how the faulty component interacts with others. For example, if you find a damaged sprocket, the diagram shows its connection to the track links. This clarity ensures you address the root cause and not just the symptoms.
Execution of Repairs or Replacements
Removing Faulty Components
Carefully remove the damaged part. Follow the diagram to ensure you’re detaching the correct component. For instance, if you need to put the tracks on after replacing a roller, the diagram will guide you through the alignment process. Use the right tools to avoid damaging nearby parts.
Installing New or Repaired Parts
When you install the track or any other replacement part, refer to the diagram for proper placement. Align the components as shown and secure them tightly. Double-check the connections to ensure everything fits as it should. This step is crucial for maintaining the excavator’s performance.
Verifying the Work with the Diagram
After completing the repairs, use the diagram to review your work. Check the tracks to ensure they’re aligned and tensioned correctly. Verify that all bolts are secure and that the replaced parts function smoothly. This final step gives you confidence that your excavator is ready to get back to work.
Pro Tip: Always keep your diagram updated if you make modifications to your excavator. This ensures accuracy for future maintenance tasks.
Tips for Maximizing Efficiency with YNF Machinery
Keep Excavator Track Parts Diagrams Easily Accessible
Having your excavator track parts diagrams within arm’s reach can make a world of difference during maintenance. Imagine trying to troubleshoot an issue without a clear reference—it’s like solving a puzzle without all the pieces. Keeping diagrams handy ensures you always have the information you need when you need it.
Here’s how you can make them more accessible:
Store diagrams, manuals, and images in a digital format. This makes them searchable and easy to pull up on your phone or tablet.
Regularly review your planning processes to ensure these documents are actively used during maintenance.
Use diagrams to guide tasks, especially when dealing with unfamiliar equipment or complex repairs.
By doing this, you’ll save time and avoid unnecessary guesswork. Plus, it helps you stay organized, even during high-pressure situations.
Cross-Reference with Equipment Manuals
Diagrams are powerful tools, but pairing them with equipment manuals takes your maintenance game to the next level. Manuals provide detailed instructions that complement the visual clarity of diagrams. For example, they include preventive maintenance schedules and step-by-step rebuild procedures.
When you’re working on your excavator, use the manual to understand the context behind each part. It’s especially helpful when commissioning new equipment, as it ensures you’re setting up proper maintenance practices from the start. Together, diagrams and manuals create a complete picture, making even the most challenging tasks manageable.
Use Digital Tools for Enhanced Visualization
Digital tools can transform how you interact with excavator track parts diagrams. Instead of static images, imagine having an interactive diagram where you can click on a part to learn more about its function. These tools make it easier to understand your excavator’s components, even if you’re not a seasoned expert.
Some platforms let you access specific part details directly from the diagram. This feature is a game-changer for operators and enthusiasts alike, as it simplifies troubleshooting and speeds up repairs. By embracing digital solutions, you’ll enhance your efficiency and gain a deeper understanding of your machine.
Regularly Update Diagrams for Modifications
Your excavator might undergo modifications over time, whether it’s upgrading parts or adapting the machine for specific tasks. These changes can make your original track parts diagram outdated. Keeping the diagram updated ensures it remains a reliable reference for maintenance.
Start by reviewing the diagram whenever you make changes to your excavator. For example, if you replace a sprocket with a newer model or adjust the track tensioning system, note these updates on the diagram. This habit prevents confusion during future repairs and helps you or your team quickly identify the correct components.
You can also use digital tools to make updates easier. Many modern platforms allow you to edit diagrams directly on your device. This way, you can save a revised version without needing to redraw the entire layout. If you prefer printed diagrams, keep a master copy and update it manually.
Tip: Set a reminder to review your diagrams periodically, even if no major changes have occurred. This ensures they stay accurate and ready for use.
Train Team Members on Diagram Usage
A well-maintained diagram is only useful if everyone knows how to use it. Training your team on diagram usage can significantly improve maintenance efficiency.
Start by introducing the basics. Show your team how to read the diagram, locate specific parts, and interpret symbols. Use real-life examples, like identifying a worn roller or diagnosing a sprocket issue, to make the training practical.
Encourage hands-on practice. Let team members use the diagram during routine inspections or minor repairs. This builds their confidence and ensures they’re prepared for more complex tasks.
You can also create quick-reference guides or cheat sheets for new team members. These resources simplify the learning process and help them get up to speed faster.
Pro Tip: Regularly review diagram usage with your team. This keeps their skills sharp and ensures everyone is on the same page during maintenance tasks.
Excavator track parts diagrams are your go-to tool for efficient maintenance. They simplify the process of identifying, diagnosing, and repairing components, saving you time and effort. By following the outlined steps, you can minimize downtime and keep your machine running smoothly. Here’s how you can implement these strategies effectively:
Monitor efficiency to spot downtime causes and address them quickly.
Schedule maintenance during slow periods to avoid disruptions.
Use automation to detect repair issues in real time for faster resolutions.
Leverage a computerized maintenance management system (CMMS) for better scheduling and data tracking.
Utilize downtime for noncore tasks to maintain productivity.
These diagrams also offer key takeaways that enhance your maintenance approach:
Key Benefit | Description |
|---|---|
Visual Tool | Helps you identify main problems and contributing factors visually. |
Collaboration | Encourages teamwork by involving multiple technicians in problem-solving. |
Problem-Solving Skills | Boosts your ability to tackle maintenance challenges effectively. |
By combining these insights with YNF Machinery’s high-quality parts, you’ll maximize efficiency and minimize downtime. With over 35 years of expertise, YNF Machinery ensures you have reliable components to support your maintenance needs.
Tip: Keep your diagrams updated and accessible. They’re invaluable for staying ahead of potential issues and ensuring smooth operations.
FAQ
What is the best way to find the right excavator track parts diagram for my machine?
Check your equipment manual first. Manufacturers usually include diagrams specific to your model. If you can’t find it, contact a trusted supplier like YNF Machinery. They can guide you to the correct diagram based on your excavator’s make and model.
How often should I update my excavator track parts diagram?
Update your diagram whenever you modify your excavator, like replacing parts with newer models. Regularly review it every six months to ensure accuracy. Keeping it current helps you avoid confusion during maintenance and ensures smooth repairs.
Can I use a digital version of the diagram instead of a printed one?
Absolutely! Digital diagrams are convenient and easy to access on your phone or tablet. Some even offer interactive features, making it simpler to locate parts. Just ensure you save a backup copy in case of technical issues.
Why is cross-referencing the diagram with the equipment manual important?
Cross-referencing combines the visual clarity of diagrams with the detailed instructions in manuals. This ensures you understand how parts function and interact. It’s especially helpful for troubleshooting and performing complex repairs accurately.
How can YNF Machinery help with excavator maintenance?
YNF Machinery provides high-quality excavator parts and expert guidance. Their team can help you identify the right components using diagrams and ensure you get reliable parts quickly. With over 35 years of experience, they’re a trusted partner for your maintenance needs.
Tip: Save YNF Machinery’s contact info for quick assistance during repairs. They’re always ready to help!