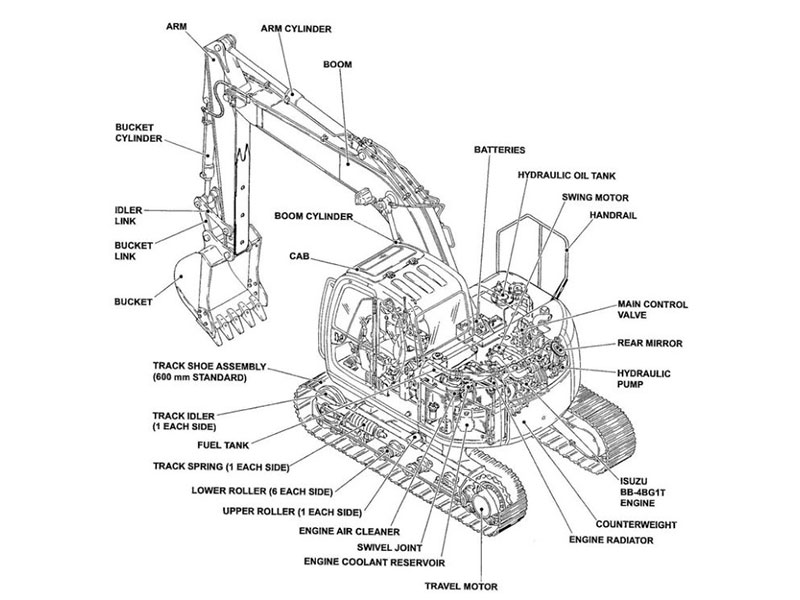
Replacing excavator joystick parts begins by turning off the machine. Disconnect the battery before you start. You should wear safety gloves and goggles. Use the correct screwdrivers and wrenches to take off the joystick cover. Remove any worn or broken excavator joystick parts. Put in new parts by copying the original setup. Make sure each part is tight. Test the joystick after you finish to see if it works well. Always keep your workspace neat and tidy.
Key Takeaways
Always turn off the machine first. Disconnect the battery before you replace joystick parts. This helps you stay safe.
Check joystick parts often for loose controls. Look for leaks and damage. This helps you find problems early.
Use the right tools for the job. Pick good quality OEM or trusted aftermarket parts. This gives you the best results.
Follow step-by-step instructions with care. Remove old parts slowly. Install new ones carefully.
Test the joystick after you finish. Make sure it moves smoothly. Check if all buttons work right.
When to Replace
Signs of Wear
You should know when to replace excavator joystick parts to keep your machine safe and efficient. Look for these common symptoms:
Loose or wobbly controls. If you move the joystick and the boom does not respond smoothly, you may have worn parts.
Hydraulic leaks. Fluid around the base of the joystick or near the boom controls often means seals or O-rings need attention.
Unresponsive buttons. If the buttons on your joystick do not work, you might have broken switches or damaged wiring.
Visible damage. Cracks, worn rubber covers, or missing button caps show that you need new excavator joystick parts.
Tip: Always check for changes in how the boom moves. Slow or jerky motion can signal problems with the joystick or its parts.
Inspection Tips
You can spot worn excavator joystick parts with a careful inspection. Start by turning off the machine and disconnecting the battery. Remove the joystick cover using the right screwdriver. Look at these key areas:
Manual control cables: Check for fraying, stiffness, or broken strands.
Aluminum triangle joints: Wiggle the joint. If it feels loose, you may need a replacement.
Rubber seals and O-rings: Look for cracks, splits, or leaks. These small parts keep hydraulic fluid inside and dirt out.
Button covers: Press each button. If it sticks or feels soft, replace the cover.
Use a flashlight to see hidden spots. Clean away dirt so you can spot leaks or damage. If you find any worn or broken parts, replace them right away. This keeps your boom and joystick working smoothly.
Tools and Parts
Tool List
You need the right tools to change excavator joystick parts. Get these things before you begin:
Screwdrivers (Phillips and flathead)
Wrenches (different sizes)
Isopropyl alcohol (for cleaning)
Glue (for quick fixes)
Safety gloves and goggles
Tip: Always wear your safety gear. Clean the joystick area with isopropyl alcohol before opening it. This keeps dirt out of the inside.
Keep your tools in order. Put small screws and washers in a tray so you do not lose them.
Sourcing Parts
You can pick OEM or aftermarket joystick parts. OEM parts are made by the original company. These parts fit just right and match your machine’s quality. They are very reliable and always work with your machine. Aftermarket parts cost less and can work well if you buy from good brands. Some aftermarket sellers, like SPARKLING MACHINERY, care about quality and give good warranties. The big difference is that OEM parts always fit the same, but aftermarket parts might be a little different. You can avoid problems by picking aftermarket brands with good quality checks and certifications.
Here is a table that shows the price range for some aftermarket joystick parts:
Brand/Model | Price Range (USD) | Notes |
|---|---|---|
JLG Aerial Work Platform | 58.00 – 98.00 | Aftermarket replacement |
Skyjack Aerial Equipment Parts | 78.00 – 138.00 | Aftermarket replacement |
Industrial Joystick for Aerial Work Platforms | 68.00 – 158.00 | Aftermarket replacement |
Haulotte Industrial Joystick | 60.00 – 90.00 | Aftermarket replacement |
Genie Industrial Joystick Controllers | 55.00 – 178.00 | Aftermarket replacement, varies by model |
Haulotte High-End Parts | 238.00 – 688.00 | Aftermarket replacement, higher-end |
Truck Parts Joystick Controller | 128.00 – 218.00 | Aftermarket replacement |
Most aftermarket joystick parts cost between $55 and $218. If you cannot find the original part, ask your dealer or look for trusted aftermarket brands. Always check the quality, warranty, and fit before you buy.
Replacement Steps
Safety First
You must always put safety first when working on your excavator’s joystick support. Lower the machine’s working device to the ground. Turn off the engine. Move the joystick and pedals several times. This step helps release any pressure in the hydraulic system. Slowly loosen the fuel tank air breather. This action lets out any leftover pressure. Wear gloves and goggles to protect your hands and eyes. Keep a clean workspace. Place a tray nearby for small parts. You should collect any oil that leaks out in a container. This step prevents spills and keeps your area safe.
Tip: Never skip safety checks. A safe start means a smooth repair.
Disassembly
Start by removing the cover from the joystick support. Use the correct screwdriver for the screws. Take off any locknuts that hold the joystick support in place. Carefully disconnect the wiring and hoses. Always label each wire and hose. This step helps you remember where everything goes later.
Follow these steps for safe disassembly:
Lower the working device and stop the engine.
Move the joystick and pedals to release hydraulic pressure.
Loosen the fuel tank air breather slowly.
Collect any oil that comes out in a container.
Remove bolts and disconnect piping from the control valve assembly.
Disconnect the pilot hose.
Disconnect the servo hose.
Lift the control valve assembly and remove its mounting bolts.
Take out the control valve assembly after all hoses are free.
Handle all small parts with care. Place screws, washers, and springs in a tray. Do not force any part of the joystick support. If something feels stuck, check for hidden screws or clips.
Install New Parts
Check your new joystick support parts before you install them. Make sure each part matches the old one. Clean the inside of the joystick support with isopropyl alcohol. Remove any dirt or old grease. Replace all seals and O-rings. These small parts keep oil inside and dirt out. Slide new rubber covers over the joystick support. Press new buttons into place if needed.
Use both hands to guide each part into position. Tighten screws and locknuts just enough. Do not over-tighten. This step keeps the joystick support from cracking. Double-check that all wiring and hoses connect to the right spots. If you see any worn wires, replace them now.
Note: Clean parts move better. A clean joystick support gives you smoother control.
Reassembly & Test
Put the joystick support back together in the reverse order. Attach the cover and tighten all screws. Reconnect the battery. Start the engine. Test the joystick support by moving it in all directions. Check for smooth movement. Press each button to make sure it works. Look for leaks around the seals and O-rings. If you see oil, stop and check your work.
If the joystick support feels loose or stiff, open it again and check for missed steps. Sometimes a small part can cause big problems. Clean up your workspace when you finish. Store your tools and leftover parts in a safe place.
Tip: Always test the joystick support before using the excavator for work. A quick test can save you from bigger repairs later.
Joystick Repair & Troubleshooting
Common Issues
You may face several problems with your excavator controls. The most common issue is a broken bucket joystick. This can cause the bucket to move slowly or not at all. Sometimes, you will notice leaking hydraulic fluid under the joystick support. This leak often comes from worn seals or damaged hoses. Loose controls can make the bucket control joystick feel sloppy or unsteady. Unresponsive buttons or sticky movement also signal trouble. If you see oil around the joystick or notice the controls do not work as they should, you need to start a repair right away.
Tip: Always check for fluid leaks, loose parts, and slow or jerky bucket movement. Early detection helps prevent bigger problems.
Quick Fixes
You can try some quick fixes before calling for help. If you spot a small hydraulic leak, clean the area well. Mark the fitting’s position, then tighten it with a torque wrench. If this does not stop the leak, take the fitting apart and check the threads. Replace any damaged sealing washers. Always depressurize the hydraulic system before you remove any parts. Use non-metallic tools to take out old seals so you do not scratch the cylinder walls. Replace damaged hydraulic lines with new ones that match the size and pressure rating.
For a broken bucket joystick, sometimes cleaning the inside and replacing worn seals or O-rings can restore smooth movement. If a button sticks, remove the cover and clean around the button. You can use glue for a temporary fix if a button cap is loose, but plan a full repair soon.
Note: Regularly check fluid levels and keep all connections clean. This helps you spot leaks early and keeps your joystick working well.
Professional Help
Some repairs need a skilled technician. If you have a broken bucket joystick that does not respond after basic fixes, call a professional. Changing the control pattern or fixing deep hydraulic leaks often requires special tools and training. If you see oil leaking from the plungers or the pilot control valve, you may need to replace the seals or the whole valve. Always ask for help if you feel unsure about any step. A professional can make sure your joystick repair is safe and complete.
Alert: Never ignore a broken bucket joystick or a major leak. Quick action keeps your machine safe and working longer.
Maintenance Tips
Preventive Care
You can keep your excavator joystick working well with regular care. Check the joystick and its parts every week. Look for loose screws or worn rubber covers. Watch for leaks around the joystick. If you see dirt or grease, clean it up right away. Use EPA-approved disinfectants that are safe for joystick surfaces. These cleaners kill germs but do not hurt the equipment.
Here is an easy way to clean your joystick:
Use a damp cloth and mild soap to wipe off dirt.
Spray disinfectant on a microfiber cloth, not on the joystick.
Wipe all buttons and handles with the cloth.
Wear gloves and a mask to stay safe while cleaning.
Do not use bleach or strong chemicals on the joystick.
Clean screens with a microfiber cloth after spraying disinfectant.
Tip: Always look for a broken bucket joystick when you check your machine. Fixing problems early stops bigger issues later.
Extending Life
You can help your excavator joystick last longer by using good parts. Pick OEM or trusted aftermarket parts for replacements. These parts fit better and last longer. When you put in new parts, follow your manual’s steps. Tighten screws enough to hold parts, but do not make them too tight.
Clean your joystick often to keep dirt and water away. Change seals and O-rings if you see leaks. Keep your machine in a dry place to stop rust and corrosion. If the joystick feels sticky or buttons do not work, fix them soon.
Note: Taking care of your joystick and fixing problems fast helps you avoid expensive repairs and keeps your excavator working well.
You can change excavator joystick parts if you follow some simple steps:
Make sure the new parts fit your excavator model.
Look in your manual for the right part numbers and directions.
Choose good parts, like OEM or trusted aftermarket brands.
Check other parts nearby for leaks or damage.
Do regular maintenance to keep things working well.
Always put safety first. Checking your machine often and using the right parts helps your excavator last longer and work better. If you are not sure what to do, ask a professional for help.
FAQ
How often should you check your excavator joystick parts?
You should inspect your joystick parts every week. Look for loose screws, worn covers, or leaks. Early checks help you find problems before they get worse.
Can you use any brand of joystick parts?
You should use OEM or trusted aftermarket brands. These parts fit better and last longer. Always check your manual for the right part numbers.
What should you do if the joystick feels stiff after replacement?
Try cleaning the inside and checking for dirt or tight screws. Lubricate moving parts if needed. If the problem continues, ask a professional for help.
Is it safe to repair joystick wiring yourself?
You can fix simple wiring if you know how. Always disconnect the battery first. If you see damaged wires or do not feel sure, call a technician.