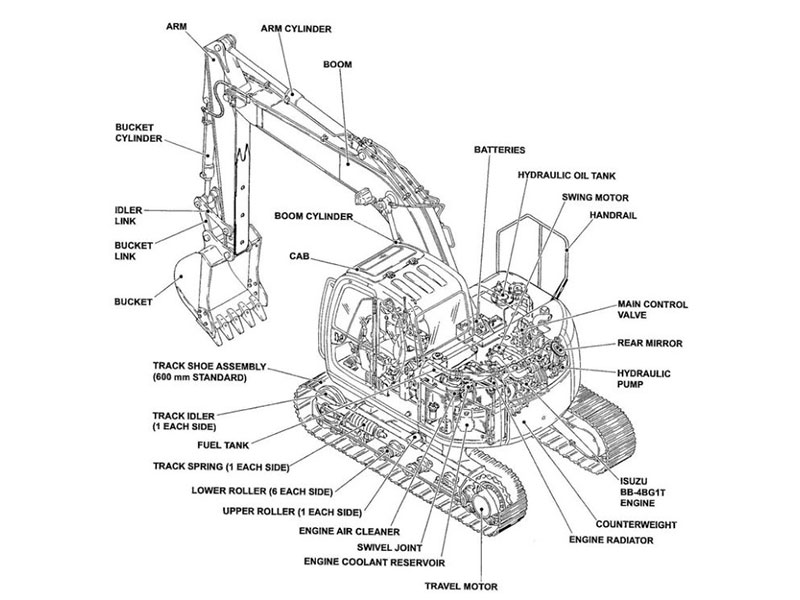

Excavator diagrams play a vital role in streamlining maintenance and repair tasks. These visual tools help you identify components quickly, reducing the time spent searching for parts or troubleshooting issues. By using these diagrams, you can enhance accuracy during repairs and avoid costly mistakes. They also improve efficiency by providing clear guidance on assembly and disassembly procedures. Integrating excavator diagrams into your routine ensures better planning and execution of maintenance tasks / maintenance checklist, ultimately saving time and money while extending the life of your equipment.
Key Takeaways
Familiarize yourself with the symbols and components in excavator diagrams to streamline maintenance tasks and reduce downtime.
Use excavator diagrams for troubleshooting by pinpointing problem areas and cross-referencing error codes for accurate diagnosis.
Combine excavator diagrams with the operator’s manual to enhance understanding and ensure correct procedures during maintenance.
Implement a structured preventive maintenance plan using diagrams to identify critical components and schedule routine inspections.
Train operators and technicians to interpret excavator diagrams effectively, promoting confidence and reducing errors in maintenance tasks.
Encourage regular use of diagrams in daily routines to reinforce knowledge and improve proactive maintenance practices.
Integrating these practices will save time and resources while extending the lifespan and reliability of your excavator.
Understand the Components and Symbols in Excavator Diagrams

Excavator diagrams are essential for understanding the intricate layout of your machine. These diagrams provide a visual representation of the excavator’s components, helping you locate parts quickly and accurately. By mastering the symbols and components, you can streamline maintenance tasks and reduce downtime.
Familiarize Yourself with Common Symbols
Excavator diagrams use standardized symbols to represent various components. These symbols simplify the process of identifying parts and understanding their functions. For example:
Hydraulic lines are often depicted as solid or dashed lines.
Electrical connections may appear as dotted lines with specific markers.
Valves, pumps, and motors have unique shapes or icons to distinguish them.
Take time to study these symbols in the diagram provided by the manufacturer. Many diagrams include a legend or key to explain the symbols. This reference ensures you interpret the diagram correctly, even if you’re new to excavator maintenance.
“An excavator parts diagram is an invaluable tool for anyone needing to order replacement parts for their heavy machinery.”
— Manufacturer’s Guide
Understanding these symbols also helps you communicate effectively with technicians or suppliers when discussing repairs or ordering parts.
Identify Key Components in the Diagram
Excavators consist of several critical sections, including the undercarriage, house, and boom. Each section contains multiple components that work together to ensure the machine operates efficiently. For instance:
The boom, stick, and bucket form the primary digging mechanism.
The cab houses the operator’s controls and provides visibility.
The hydraulic system powers the movement of the boom and other parts.
When reviewing an excavator diagram, focus on these main areas. Locate the components within each section and note their connections. This practice helps you understand how the parts interact and aids in diagnosing issues. For example, if the bucket isn’t functioning correctly, you can trace the hydraulic lines in the diagram to identify potential problems.
Regularly consulting the diagram also allows you to spot wear and tear on parts like edges, plates, and teeth. Early identification of these issues prevents costly repairs and extends the life of your equipment.
Use Excavator Diagrams for Troubleshooting
Excavator diagrams serve as a powerful tool when diagnosing issues with your equipment. They provide a clear visual representation of the machine’s components, helping you identify and resolve problems efficiently. By incorporating these diagrams into your troubleshooting process, you can minimize downtime and ensure accurate repairs.
Pinpoint Problem Areas
When your excavator experiences a malfunction, start by consulting the diagram to locate the affected area. The diagram outlines the connections between components, making it easier to trace the source of the issue. For example:
If the hydraulic system fails, follow the hydraulic lines in the diagram to identify potential blockages or leaks.
If the electrical system malfunctions, use the diagram to locate wiring connections and check for loose or damaged cables.
This method eliminates guesswork and reduces the risk of misdiagnosis. By pinpointing the problem area quickly, you save time and avoid unnecessary repairs. Additionally, using the diagram ensures that you address the root cause of the issue rather than just the symptoms.
“Using excavator diagrams streamlines the process, reduces misunderstandings, and accelerates delivery times.”
— Maintenance Best Practices Guide
Cross-Check with Error Codes
Modern excavators often display error codes when a problem arises. These codes provide valuable clues about the nature of the issue. Cross-referencing the error codes with the excavator diagram enhances your troubleshooting accuracy. Here’s how:
Identify the error code displayed on the machine’s control panel.
Refer to the operator’s manual to understand the meaning of the code.
Use the excavator diagram to locate the corresponding component or system.
For instance, if an error code indicates a hydraulic pressure issue, the diagram helps you trace the hydraulic circuit and inspect related components. This approach ensures that you address the specific problem highlighted by the error code, reducing the likelihood of overlooking critical details.
By combining error codes with the visual guidance of the excavator diagram, you create a systematic troubleshooting process. This not only improves efficiency but also boosts your confidence in resolving complex issues.
Cross-Reference Diagrams with the Operator’s Manual
Excavator diagrams become even more effective when paired with the operator’s manual. The manual provides detailed written instructions that complement the visual clarity of the diagram. Together, they create a comprehensive guide for maintaining and repairing your equipment.
Combine Visual and Written Information
Using both the excavator diagram and the operator’s manual allows you to approach maintenance tasks with greater confidence. The diagram offers a clear visual representation of the machine’s components, while the manual explains their functions and proper handling. For example:
The manual may describe the steps for disassembling a hydraulic pump. The diagram shows the exact location of the pump and its connections.
If you need to replace a part, the manual provides safety precautions and procedural details. The diagram ensures you identify the correct part and its placement.
This combination minimizes errors and ensures you follow the correct procedures. It also helps you understand the relationships between components, which is crucial for diagnosing complex issues. By cross-referencing these resources, you can complete tasks more efficiently and avoid unnecessary delays.
“An excavator parts diagram is an invaluable tool for anyone needing to order replacement parts for their heavy machinery.”
— ConEquip Parts
Verify Part Numbers and Specifications
The operator’s manual often includes part numbers and specifications for each component. Cross-referencing these details with the excavator diagram ensures you select the right parts for repairs or replacements. This step is essential for maintaining the integrity of your equipment. Here’s how you can do it:
Locate the component in the excavator diagram.
Check the part number or specification listed in the manual.
Confirm that the part matches the requirements before ordering or installing it.
For instance, if you need to replace a hydraulic hose, the manual specifies the correct diameter and length. The diagram helps you trace the hose’s path and identify its connections. Verifying these details prevents compatibility issues and ensures the machine operates as intended.
Regularly consulting both the diagram and the manual also helps you stay updated on any changes or upgrades to your equipment. Manufacturers may revise part numbers or specifications over time, and cross-referencing ensures you always use the most accurate information.
Leverage Diagrams for Preventive Maintenance
Preventive maintenance is essential for keeping your excavator in optimal condition. By using an excavator diagram, you can plan and execute maintenance tasks with precision. This proactive approach minimizes unexpected breakdowns, reduces repair costs, and extends the lifespan of your equipment.
Plan Routine Inspections
Routine inspections are the foundation of preventive maintenance. An excavator diagram helps you identify critical components that require regular checks. Focus on areas prone to wear and tear, such as hydraulic systems, electrical connections, and moving parts.
To create an effective inspection plan:
Divide the machine into sections: Use the diagram to break down the excavator into manageable parts, such as the undercarriage, boom, and cab.
Set inspection intervals: Determine how often each section needs to be inspected based on usage and manufacturer recommendations.
Document findings: Record any signs of wear, leaks, or damage during inspections. This documentation helps you track issues over time and address them before they escalate.
“The secret to an effective preventive maintenance plan is to get the frequency of maintenance scheduling right to avoid increased costs and wasted time.”
— Maintenance Managers
By following a structured inspection routine, you can catch potential problems early and ensure your excavator operates efficiently.
Schedule Maintenance Tasks
Scheduling maintenance tasks ensures that your excavator remains in peak condition. Use the excavator diagram to prioritize and organize these tasks. A well-planned schedule reduces downtime and keeps your equipment ready for operation.
Here’s how to create a maintenance schedule:
Identify maintenance needs: Refer to the diagram to pinpoint components that require regular servicing, such as filters, hoses, and joints.
Assign specific dates: Schedule tasks based on the frequency recommended in the operator’s manual. For example, replace hydraulic fluid every 500 hours or inspect the bucket teeth monthly.
Coordinate with your team: Share the schedule with operators and technicians to ensure everyone understands their responsibilities.
“Creating a preventive maintenance schedule is crucial for increasing efficiency and extending asset lifespan.”
— Maintenance Professionals
A consistent maintenance schedule not only prevents unexpected failures but also improves the overall performance of your excavator. Regularly consulting the diagram during these tasks ensures accuracy and helps you stay organized.
Train Operators and Technicians to Interpret Diagrams
Training your operators and technicians to interpret excavator diagrams is essential for efficient maintenance and repair. Proper training ensures they can identify components, understand connections, and follow procedures accurately. This knowledge reduces errors, minimizes downtime, and enhances the overall performance of your equipment.
Provide Hands-On Training
Hands-on training is the most effective way to teach operators and technicians how to use excavator diagrams. Practical experience helps them connect theoretical knowledge with real-world applications. Here’s how you can implement hands-on training:
Start with the basics: Introduce the layout of the excavator diagram. Explain the symbols, components, and their functions. Use a manufacturer-provided diagram to ensure accuracy.
Simulate real scenarios: Create mock maintenance tasks or troubleshooting exercises. For example, ask trainees to locate a hydraulic pump on the diagram and then find it on the actual machine.
Encourage active participation: Let trainees handle the diagrams and perform tasks under supervision. This approach builds confidence and reinforces their understanding.
“A thorough training course can help ensure operators understand the material and know the right procedures to follow.”
— Maintenance Training Guide
Hands-on training also allows you to address individual learning needs. Some may grasp concepts quickly, while others may need additional guidance. By tailoring the training to their pace, you ensure everyone gains the skills needed to interpret diagrams effectively.
Encourage Regular Use of Diagrams
Encouraging regular use of excavator diagrams helps operators and technicians retain their knowledge. Frequent practice ensures they stay familiar with the layout and components, making it easier to perform maintenance tasks. Here are some strategies to promote regular use:
Integrate diagrams into daily routines: Require operators to consult the diagram before starting any maintenance or repair work. This habit reinforces their understanding and reduces the likelihood of mistakes.
Provide easy access to diagrams: Keep printed copies in the workshop and digital versions on mobile devices. Easy access ensures operators can reference the diagram whenever needed.
Conduct periodic reviews: Schedule refresher sessions to revisit key concepts. Use these sessions to address questions, share updates, and reinforce best practices.
“Familiarizing yourself with your excavator is key to identifying when its parts begin to wear or whether something is damaged.”
— Equipment Maintenance Guide
Regular use of diagrams not only improves technical skills but also fosters a proactive approach to maintenance. Operators who consistently consult diagrams are more likely to spot issues early and address them before they escalate.
Using an excavator diagram effectively can transform your maintenance routine. By understanding components, troubleshooting issues, cross-referencing with manuals, planning preventive maintenance, and training your team, you ensure your equipment operates at peak performance. These practices reduce downtime, extend the machine’s lifespan, and cut costs. Preventive maintenance, supported by diagrams, enhances efficiency and minimizes unexpected repairs. Start integrating these tips into your workflow today. You’ll not only save time and resources but also improve the reliability of your excavator for years to come.